TABLE OF CONTENTS
- Ways to create (overview)
- Fields that depend on company settings
- 1) Email capture with AI
- 2) Manual create on the web
- 3) COD (field purchase)
- 4) Recurring Bills
- 5) Invoices that use a Vendor PO
- After the invoice exists
- FAQ
- Next in the set
Fieldclix can open a vendor bill from email, from the web, from a schedule, or from a COD purchase. Every path ends as a Vendor Invoice you process in VIM.
Who creates manually on the web: VIM Validator (with access to VIM → Invoices or Review, usually via the Financial role).
After create: Process Vendor Invoices; Dashboards: VIM Invoices and Review
Ways to create (overview)
Path | How it starts | Starting stage |
|---|---|---|
Email capture (AI) | Vendor emails your capture address | Pending |
Manual — NEW INVOICE | Web toolbar | Draft → Submit → Pending |
NEW COD / mobile COD | Web or app | Draft (COD invoice) |
Recurring Bills | Scheduled / generated from a recurring template | Usually Pending (as generated) |
From a Vendor PO | Create an invoice, then fill lines from the PO | Same as manual / capture |
Fields that depend on company settings
Fieldclix Settings (Purchasing / VIM) are configured per company. On Vendor Invoices they can change, for example:
- which header fields appear (Tax fields, COD Number prefill, and similar)
- how Invoice Lines columns auto-fill or which allocation columns are required
- how Fieldclix looks for potential duplicates (the alert and SHOW list still work the same way — the match rules can differ)
Field / behavior |
|---|
Tax, Tax Amount, Total with Tax hidden |
Number on a COD invoice prefilled from card Name or Abbr |
GL Account or Service Item filled when you pick a Financial Account on a line |
Notes set to the Build Plan name when you pick a Build Plan |
Class not auto-filled from Build Plan / Service Item |
Class required before validate |
Prefer service-item distribution by Build Plan |
Service Item required on direct-cost (non-overhead) Build Plan lines |
How potential duplicates are detected |
1) Email capture with AI
Vendors send invoices to your company’s capture address (for example invoice.[yourcompany]@fieldclix.com). Fieldclix:
Takes each supported attachment.
Extracts text (OCR on the first page for PDFs, plus full-document text) and reads the layout with AI, together with the email subject.
Creates a Vendor Invoice in Pending.
Writes structured values onto the card and into Description.
Attaches the original file.
Tries to match a Vendor from your active vendor list.
One supported file = one invoice. If one PDF contains several bills, capture does not split them — see How to Handle Multiple Vendor Invoices/Bills in a Single Document File.
Attachments
| Rule | Detail |
|---|---|
| Supported formats | PDF, DOC, DOCX, XLS, XLSX |
| One attachment = one invoice | Each supported file in the email creates a separate VIM Invoice |
| Recommended file size | Keep attachments under 20 MB (total per email) to avoid capture errors |
| Empty attachments | Files with 0 bytes are rejected |
| No attachments | Emails without supported attachments are not captured |
| Unsupported formats | PNG, JPEG, and other non-invoice formats are ignored (not converted) |
Examples: PDF invoice + PNG logo → only the PDF becomes an invoice. Two PDFs in one email → two invoices.
Ask Fieldclix Support to configure or change your capture address.
What AI reads and fills
AI looks for the issuer / seller on the invoice (not Bill To or Ship To). It may also read a customer Account Number from the document or the email subject. AI can return one or two vendor-name variants (brand name and legal name) from the same file.
From the document | On the invoice | Notes |
|---|---|---|
Invoice number | Number | |
Invoice date | Date | Only if the date falls in an active financial period; otherwise left empty |
Total / amount due | Total | Prefer Amount Due / Balance Due / invoice total. Not cash discount, early-pay / prompt-pay discount, or credit-card / convenience-fee totals |
Vendor name(s), Account Number | Used to match Vendor | Always copied into Description; not stored as separate header fields beyond matching |
Email + AI summary | Description | Always written — even when Vendor is matched |
When a Vendor matches, the card also inherits vendor defaults: Payment Term, Invoice Category, Responsible, and default allocation lines. Confirm them before you validate.
Description block
Every captured invoice has a Description with email metadata (for example Email from, Subject) and an AI-extracted Fields section (Invoice Number, Date, Vendor Names, Account Number, Total Amount).
Validators use this block when Vendor did not match — and to double-check Number, Date, and Total against the PDF.
How Vendor is selected
Fieldclix loads active vendors (Name, Print Name, Account Number, Email Domain) and tries three steps. At each step it sets Vendor only when exactly one vendor matches. If more than one fits (or none do), Vendor stays empty for manual review.
Account Number + name — AI Account Number equals the vendor’s Account Number, and at least one word of the AI vendor name appears in Name or Print Name (best for company divisions).
Exact name — AI vendor name equals Name or Print Name (after normalizing punctuation and spacing).
Sender email domain — domain after
@matches Email Domain on exactly one active vendor. Forwarded mail can use the wrong domain — then rely on Description or fix vendor master data.
When Vendor is not filled automatically
The invoice is still created in Pending, with the attachment and AI values in Description.
You cannot Validate (or move further) until Vendor is selected — Fieldclix shows that Vendor is not specified.
What to do:
Open the invoice and read Description → AI-extracted Fields.
Select the correct Vendor.
Check Number, Date, and Total against the attachment.
Continue as in Process Vendor Invoices.
To improve the next capture, keep the vendor record accurate and Active:
Field | Purpose |
|---|---|
Account Number | Primary tiebreaker for divisions with the same company name (often synced from QuickBooks Acct No.) |
Print Name | Match when the invoice wording differs from internal Name |
Email Domain | Domain only (no |
Notifications (optional)
Your company can email the Vendor on stage changes (for example when capture creates a Pending bill) if send email notifications is on for that vendor. Validator alerts follow Notification Events: configured per company.
2) Manual create on the web
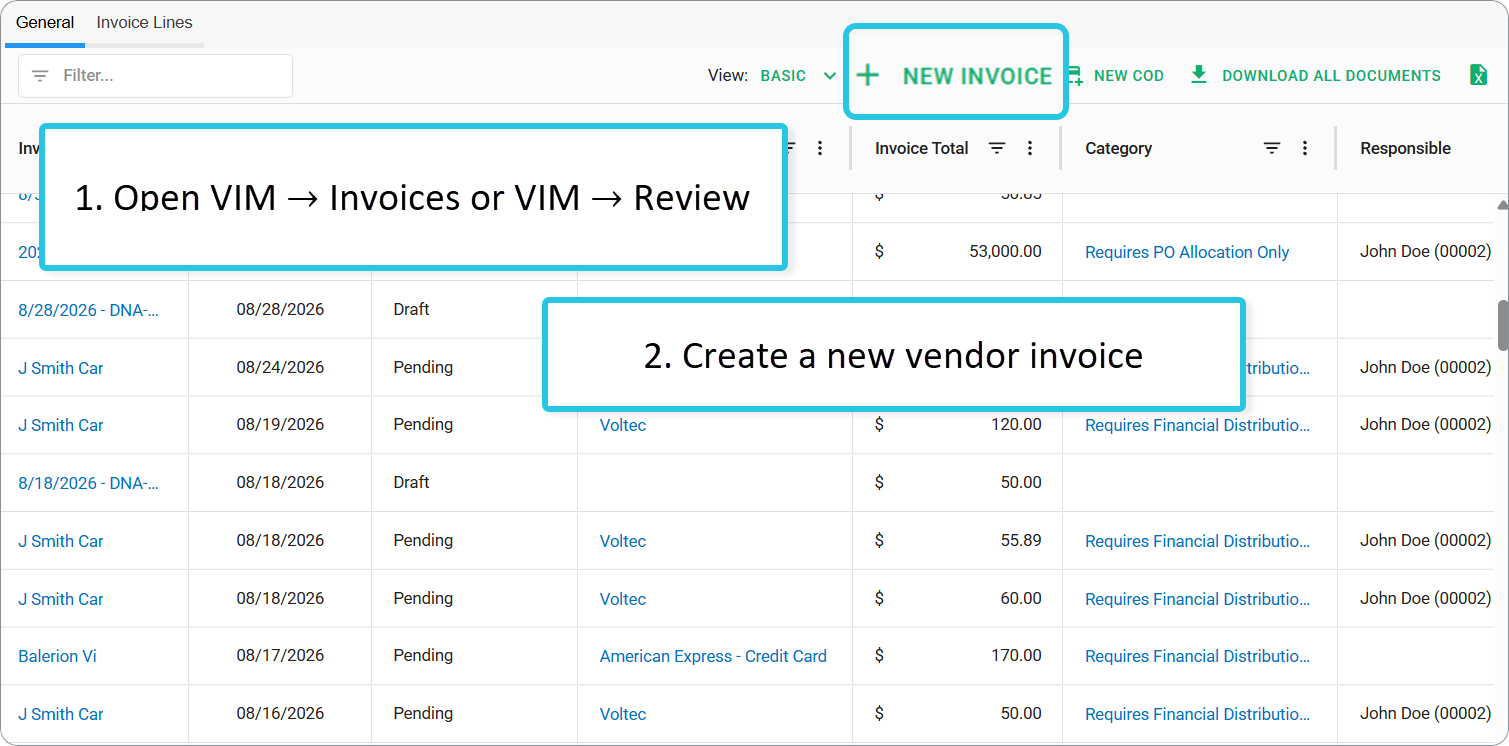
- Open VIM → Invoices or VIM → Review.
- Click NEW INVOICE.
- Fill the vendor, amounts, category, and lines (or save a partial Draft).
- Attach the vendor PDF or image on the card (Drop files here or click to upload / Add Document), then SAVE.
- Optional: with a saved attachment on a Draft or Pending bill in Edit, use Fill from Document to suggest Number, Date, Total, Vendor, and Description from the file (same AI reading as email capture). Unsaved uploads are ignored until you save.
- Click Submit when ready — stage moves from Draft to Pending.
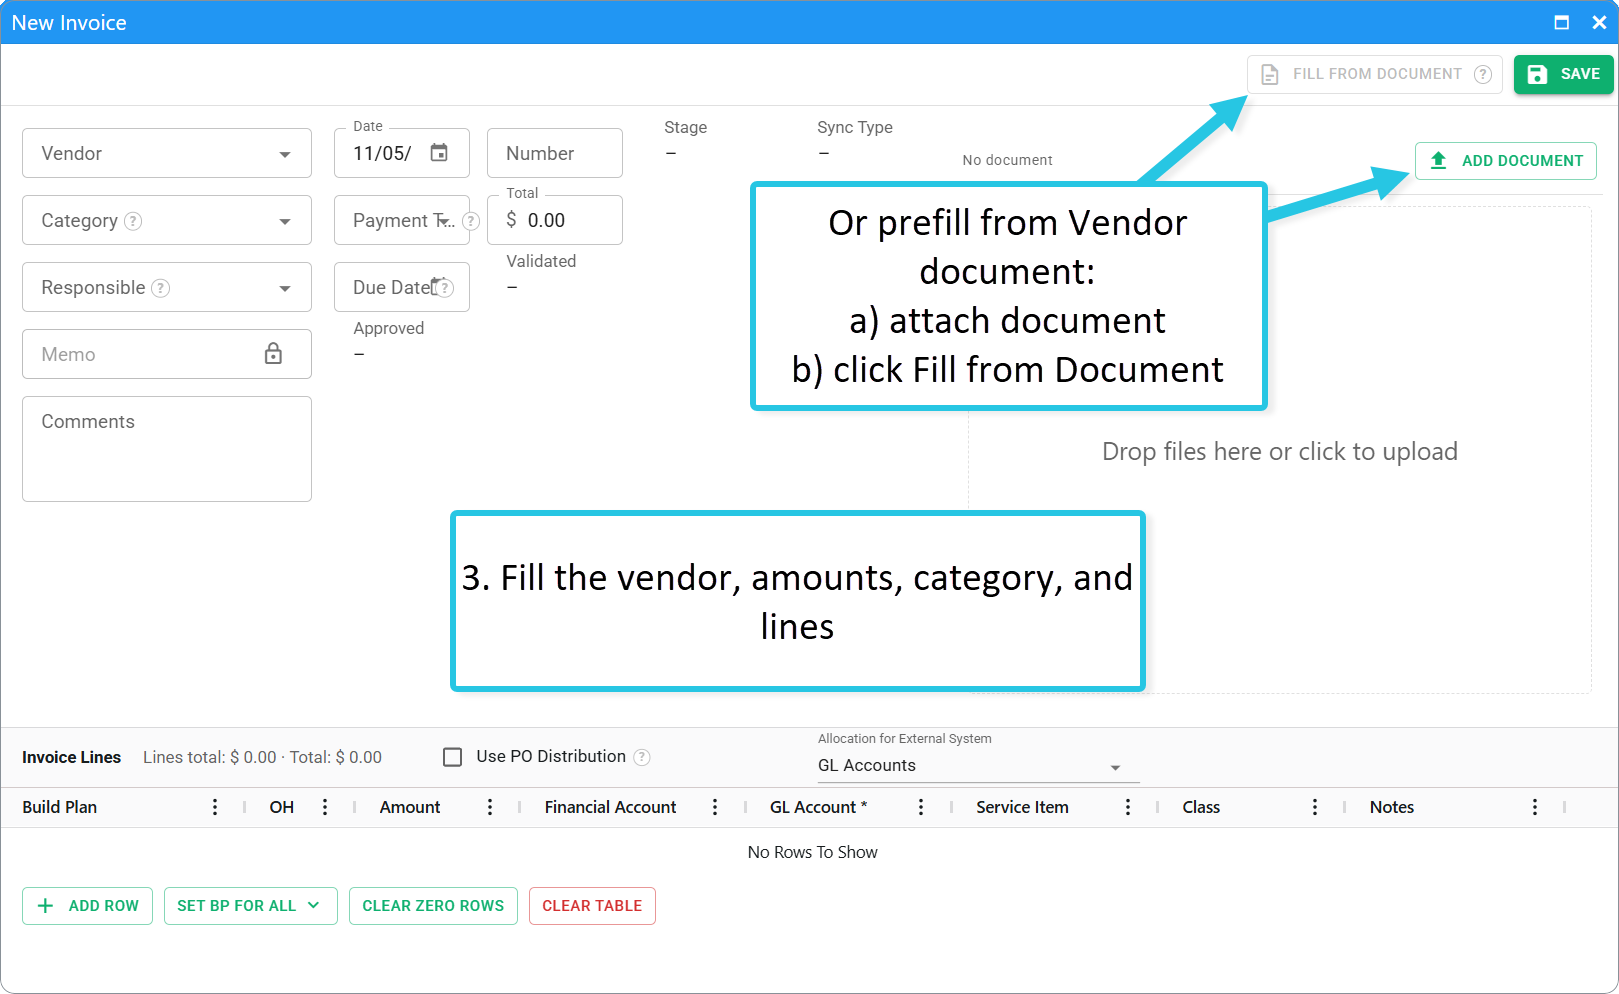
Fill from Document vs email capture: capture creates the bill from an inbound email. Fill from Document runs on a bill you already opened — after you attached and saved a document. Full steps and warnings: Process Vendor Invoices → Fill the invoice card.
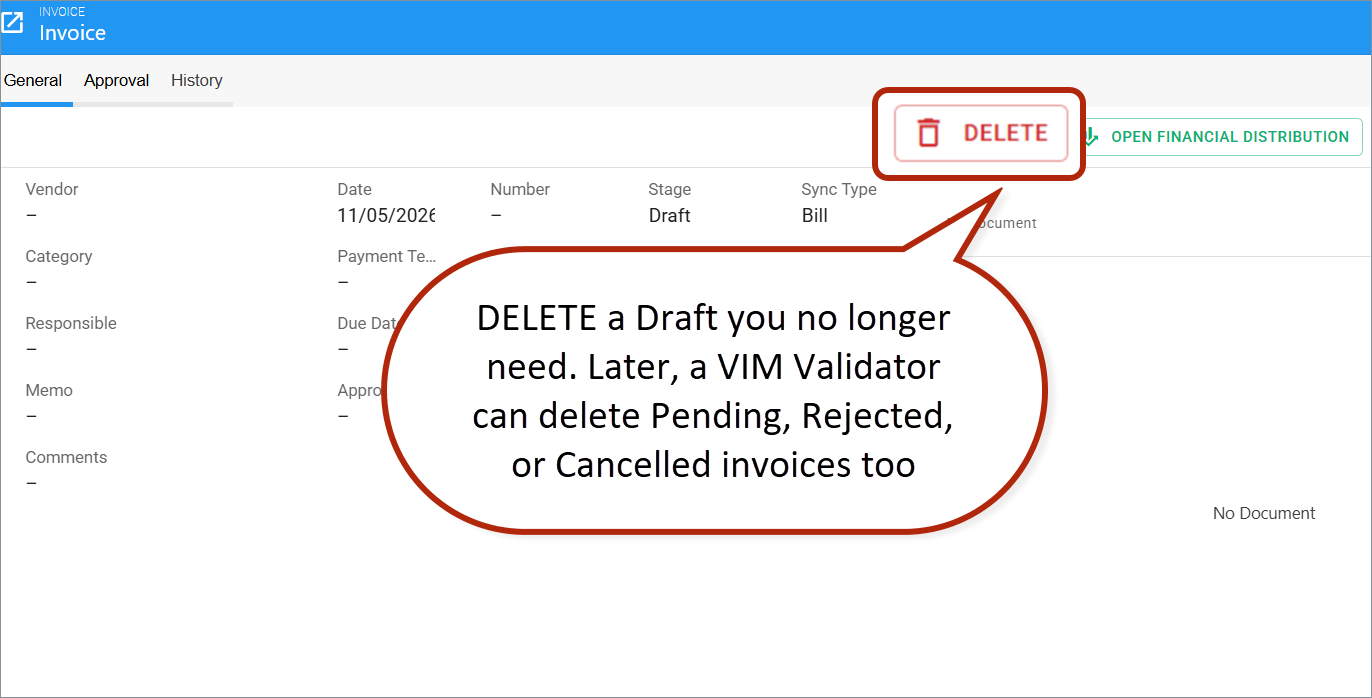
You can also DELETE a Draft you no longer need. Later, a VIM Validator can delete Pending, Rejected, or Cancelled invoices too — details: Process Vendor Invoices → Delete.
3) COD (field purchase)
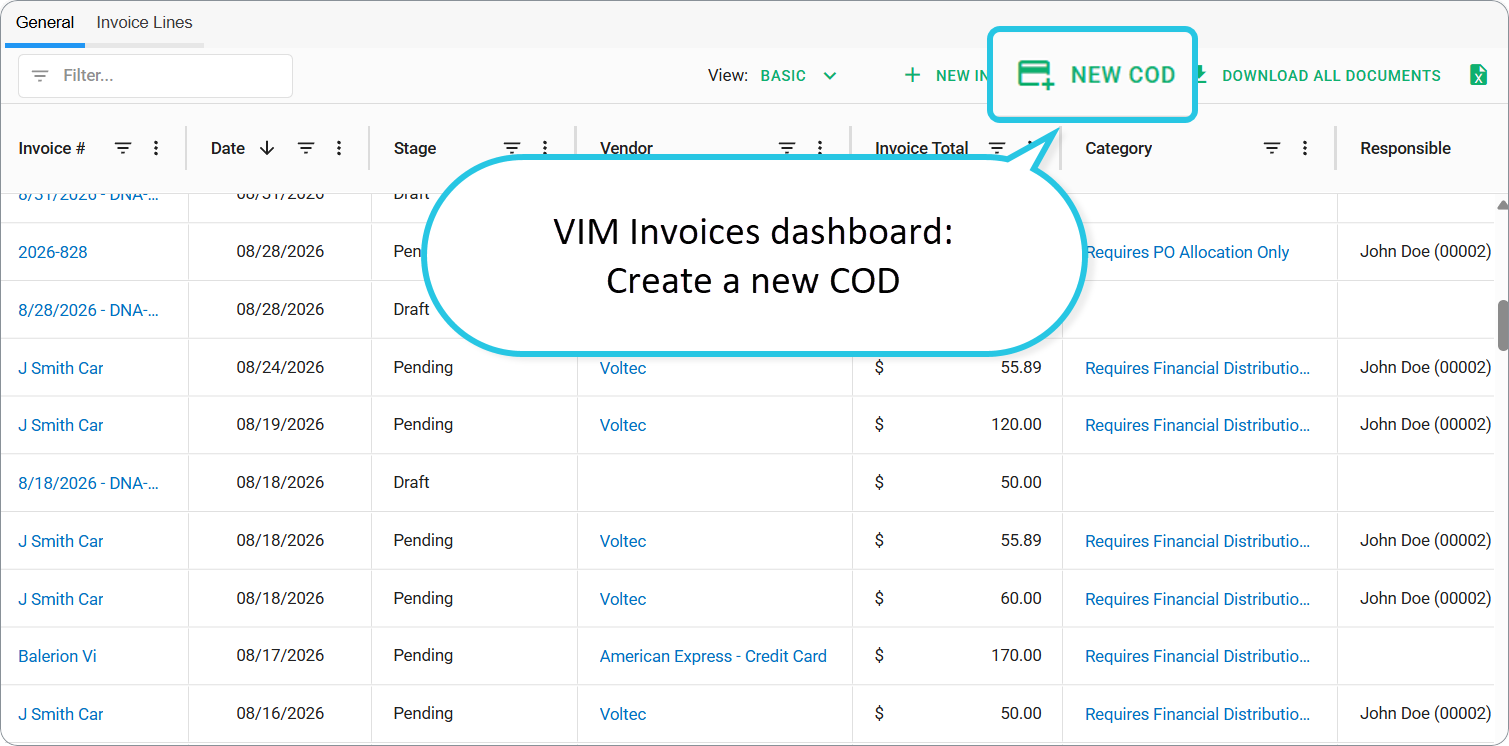
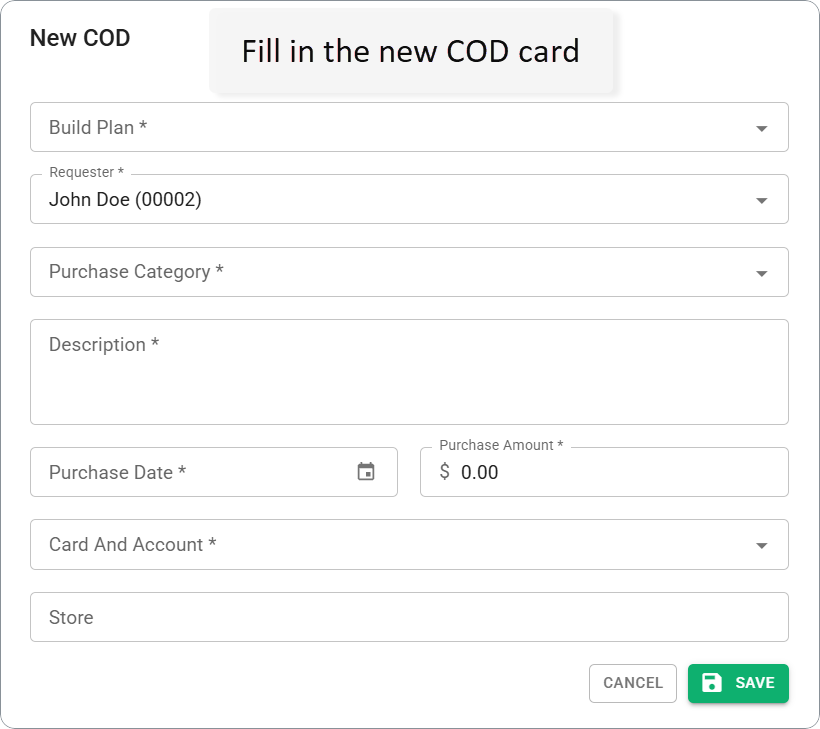
A COD is a Vendor Invoice marked as COD — created from the mobile app or from NEW COD on the web.
Mobile: role Mobile. Allow COD Requests — Submit Receipt / COD Request in App
Full COD story: COD Purchases
Setup: Configure COD module
Vendor on a COD usually comes from the card Issuer. Purchase date becomes the invoice date.
4) Recurring Bills
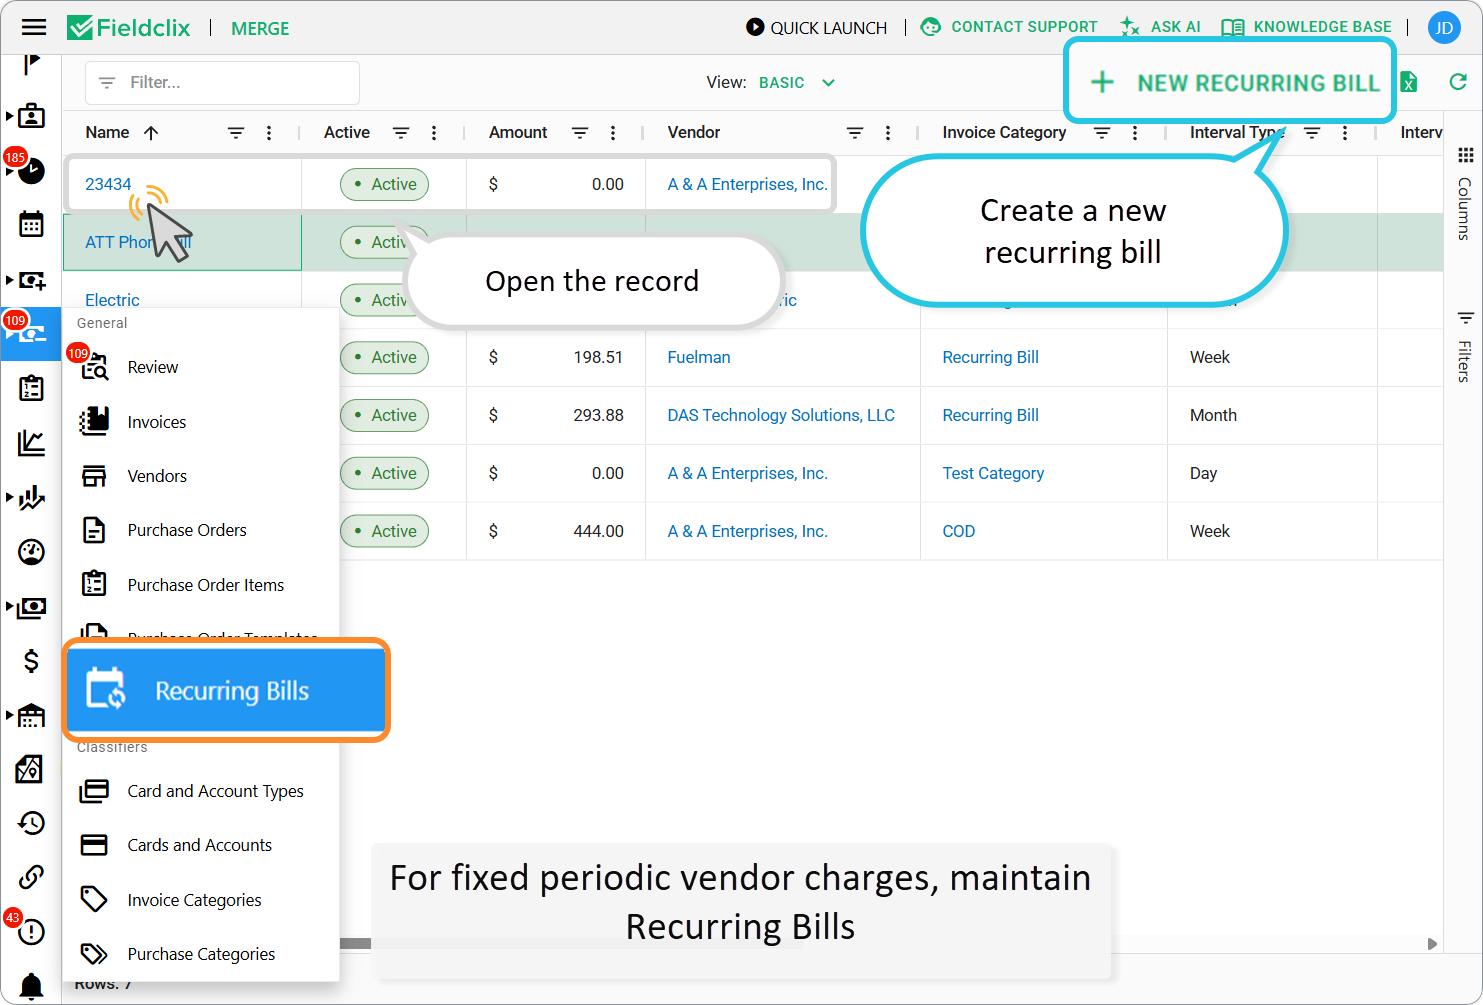
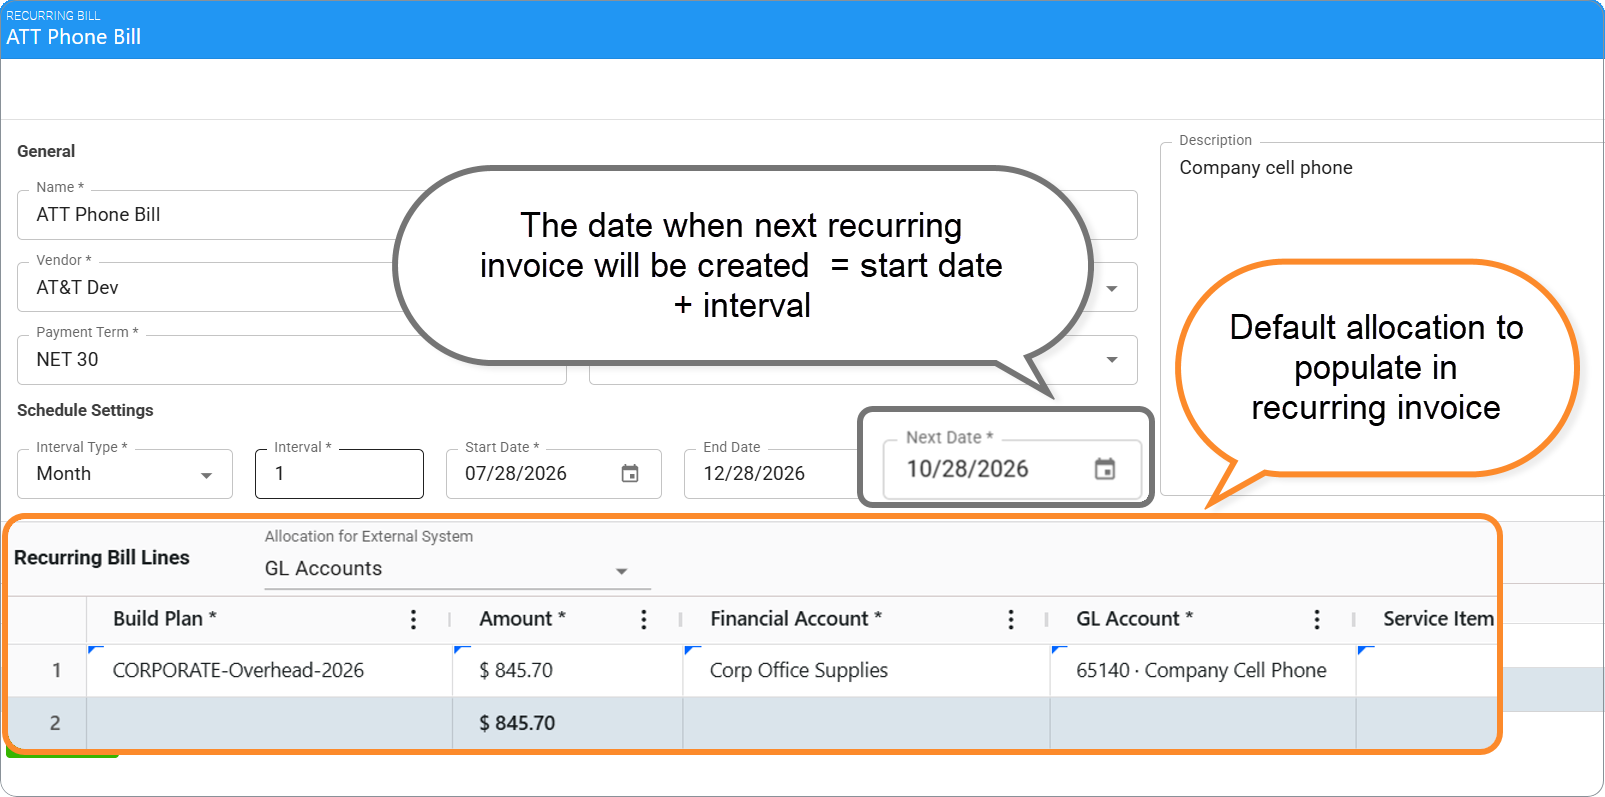
For fixed periodic vendor charges, maintain VIM → Recurring Bills. Fieldclix generates Vendor Invoices on the schedule your company uses. Generated bills appear in Invoices / Review like any other invoice — then validate and approve as usual.
Who manages recurring templates: Accountant and Bookkeeper or Project Library Manager.
5) Invoices that use a Vendor PO
Create the invoice (capture or NEW INVOICE).
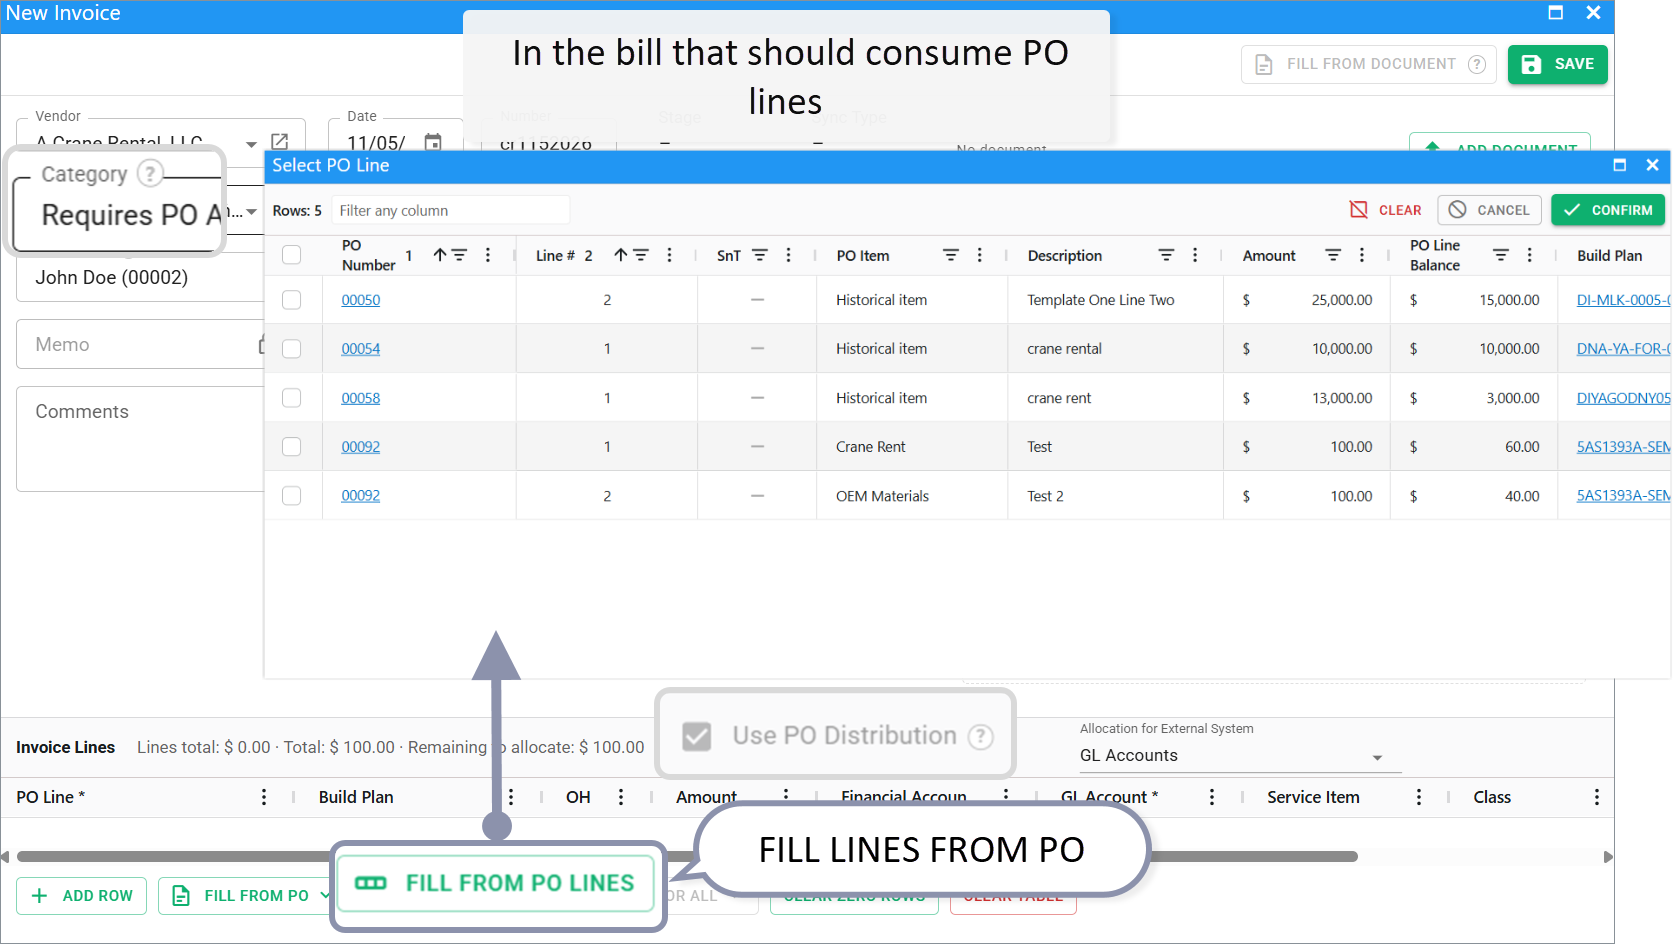
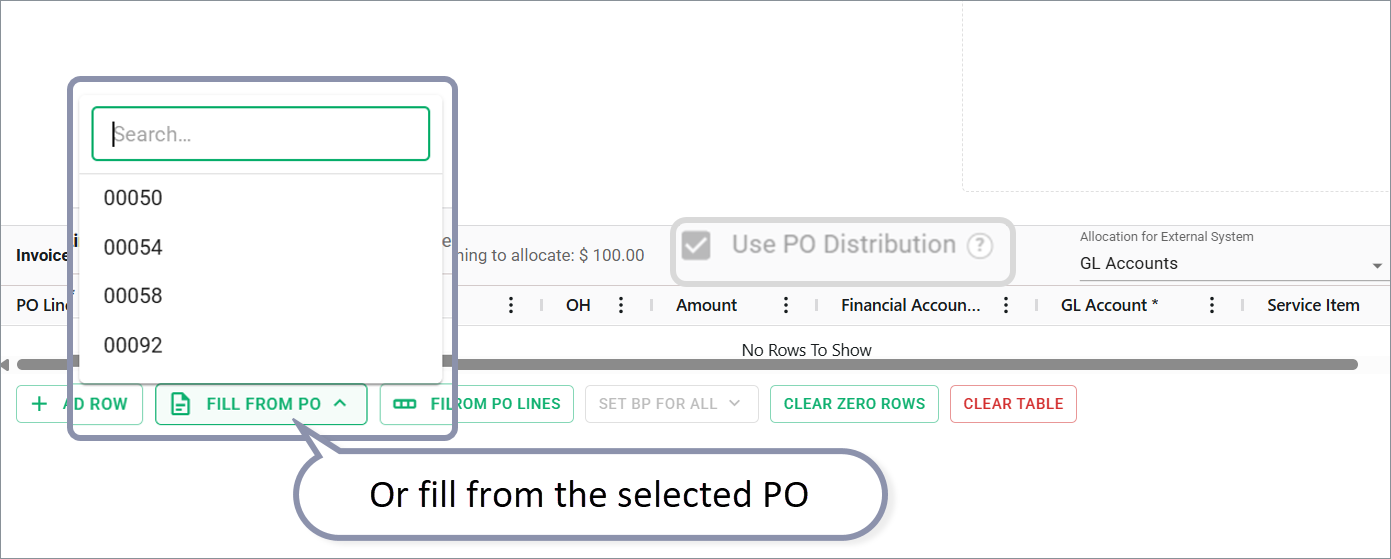
On the invoice, use Use PO Distribution when the bill should consume PO lines.
Use FILL LINES FROM PO or FILL LINES FROM PO LINES to pull amounts and accounts.
Adjust lines, then validate.
PO setup and balance: see the VIM PO articles (create PO, life cycle, balance).
After the invoice exists
Role | First job |
|---|---|
VIM Validator | Open from Review or Invoices, complete the card and lines, Validate (or Reject) |
Approver | Wait until Under Approval, then Approve or send For Revision |
Accountant | After Approved, Pay / Void and watch sync |
Step-by-step for everyone: Process Vendor Invoices.
FAQ
Q: Why is my captured invoice already Pending, but a manual one starts as Draft?
A: Capture assumes the vendor already sent a real bill. Manual create lets you finish the card before Submit.
Q: Who can click NEW INVOICE?
A: Users with VIM Validator (and menu access to VIM Invoices / Review). Field staff create COD with Mobile. Allow COD Requests, not full AP create.
Q: Can I create one invoice from a multi-page PDF that has three bills?
A: Capture does not split one file into three invoices. Split the PDF or follow the multi-bill guide linked above.
Q: Capture created the bill but Vendor is empty. Is that broken?
A: No. Matching needs exactly one active vendor. Use Description → AI-extracted Fields, pick Vendor, then validate. Fix Account Number / Print Name / Email Domain on the vendor for next time.
Q: Why is Fill from Document disabled?
A: The invoice must be in Edit on Draft or Pending, and it needs at least one saved document. Upload the file, then try again.
Next in the set
Was this article helpful?
That’s Great!
Thank you for your feedback
Sorry! We couldn't be helpful
Thank you for your feedback
Feedback sent
We appreciate your effort and will try to fix the article