TABLE OF CONTENTS
- Who is involved
- 1. Fill the invoice card
- 2. Fill allocation (Invoice Lines)
- 3. Validate and send for approval
- 4. Reject
- 5. Delete
- 6. Approve
- 6. Void (Cancelled)
- 7. Sync to accounting
- 8. Pay / Partially Paid / Paid
- FAQ
- Next in the set
This guide walks through a Vendor Invoice from fill-in to paid — for every role in the VIM process.
You work on the invoice card (opened from VIM → Invoices or VIM → Review). Buttons on the card toolbar change with the stage and your role.
Who is involved
Role | Main steps |
|---|---|
VIM Validator | Fill card and lines; Submit (Draft); Validate or Reject; Send for Approval; Return to Pending |
Approver (from category rules) | Approve or For Revision while Under Approval |
Advanced VIM Approver | May edit allocation lines while Under Approval |
VIM Approval Override | Force Approve while Under Approval |
Accountant and Bookkeeper | Pay, Void; edit after Approved when needed |
Financial | Opens Invoices / Review menus (often combined with Validator) |
Stages you will see: Draft → Pending → Validated → Under Approval → Approved → Partially Paid / Paid, plus Rejected and Cancelled (Void).
1. Fill the invoice card
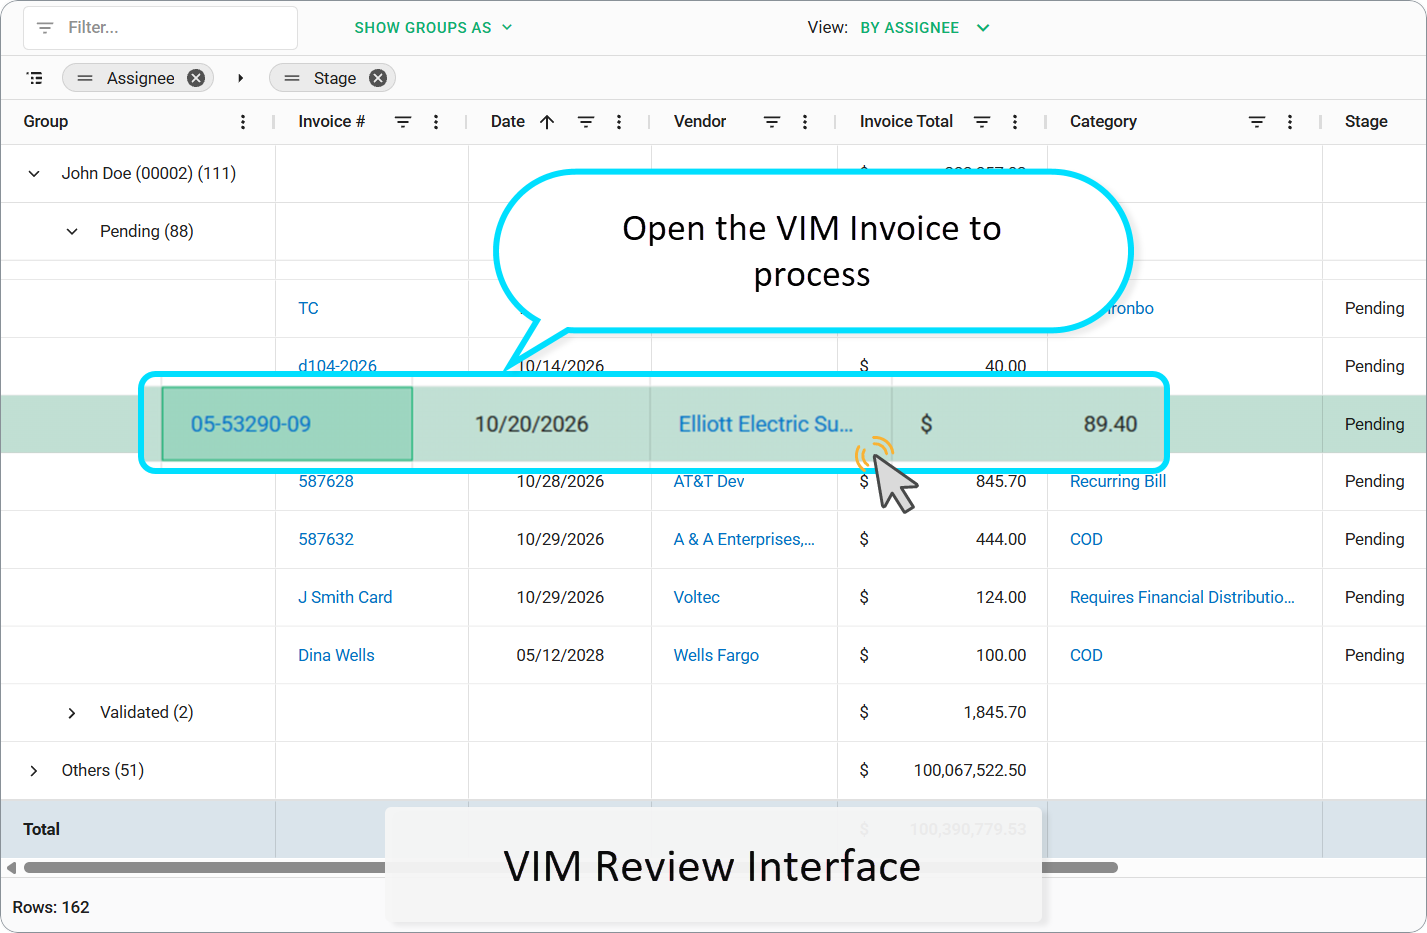
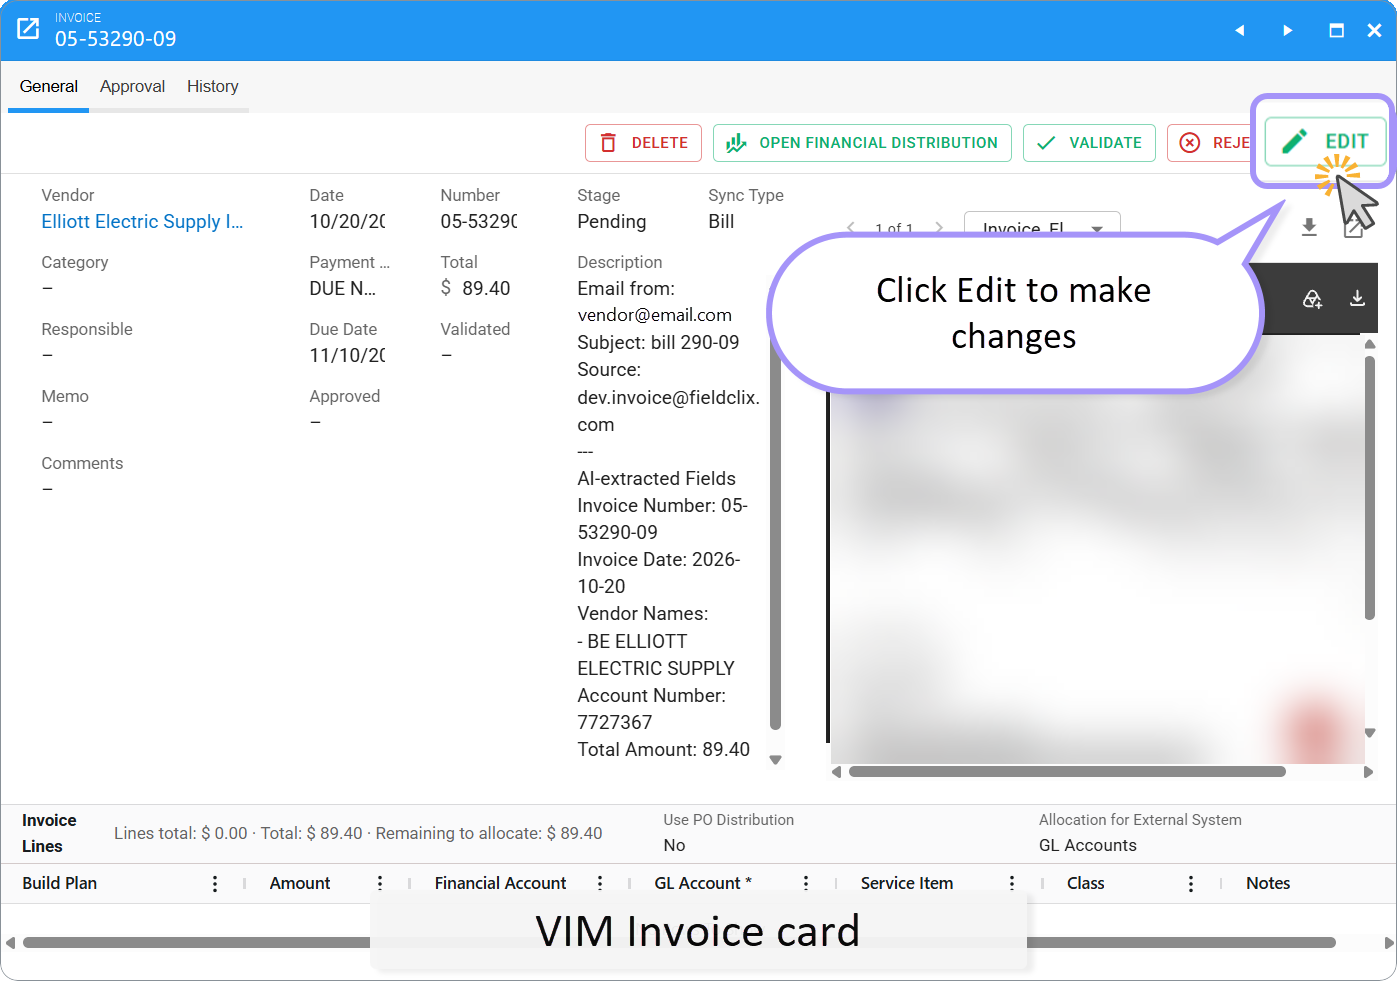
Open the invoice from Review (work queue) or Invoices (full list). Click Edit when the card is view-only and editing is allowed for your role and stage.
Header and lines are editable in Draft (creator or VIM Validator) and in Pending (VIM Validator only). Later stages lock the card for general edit — exceptions are noted under each step below.
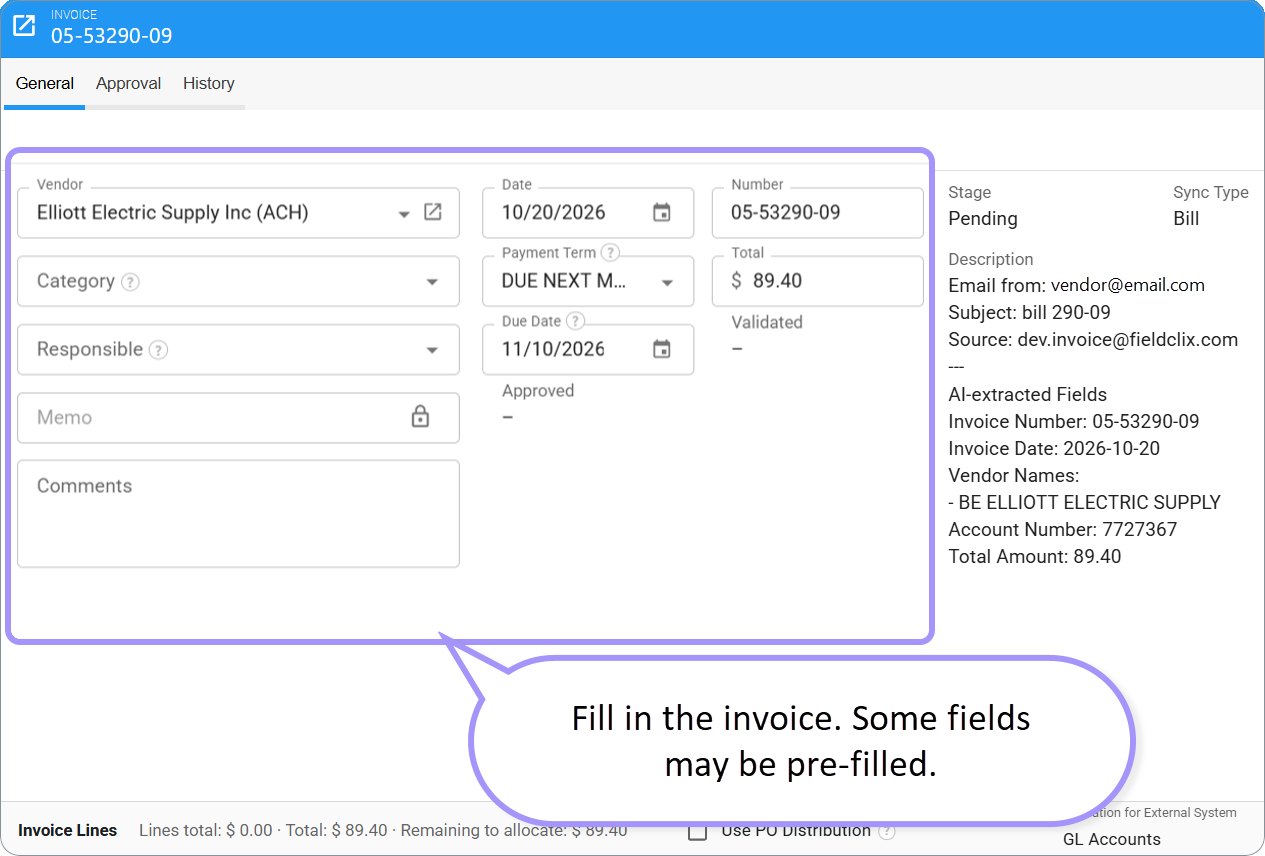
Header fields (typical)
Field | Notes |
|---|---|
Vendor | Required for processing. When you select or change Vendor, Fieldclix refreshes Category, Responsible, Payment Term, and can rebuild default allocation lines. On COD, Vendor usually comes from the card Issuer. |
Category | Invoice Category — drives allocation rules and approval. Pulled from the Vendor’s default (or Purchase Category for COD). Changing Vendor overwrites a category you set by hand. |
Responsible | Who owns the bill for AP. Pulled from the Vendor; overwritten when Vendor changes. |
Date | Invoice date (for COD = purchase date). |
Number | Invoice number. On COD it may prefill from company settings — otherwise enter it manually. |
Total | Amount due. |
Payment Term | Pulled from the Vendor. |
Due Date | Calculated from Payment Term + Date. Change either field and Due Date recalculates. |
Tax / Tax Amount / Total with Tax | Shown only when tax is enabled for your company (company setting). |
Memo, Comments | Memo can auto-fill from the Invoice Category print-memo template on create/save unless marked custom. |
Stage, Sync Type | Stage is set by actions; Sync Type often comes from card type (COD) or defaults. |
Validated / Approved dates | Filled by the system when those actions succeed. |
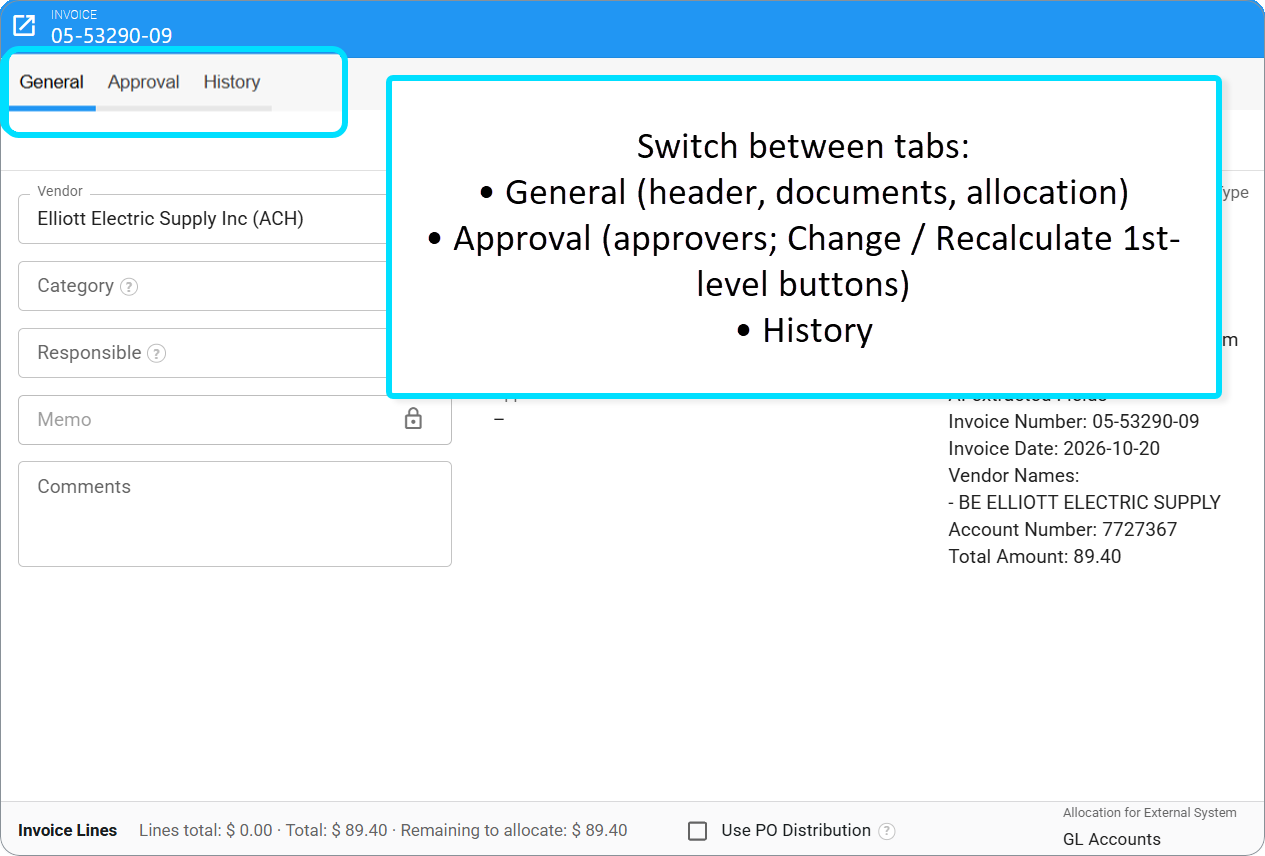
The invoice card has three tabs: General (header, documents, allocation), Approval (approvers; Change / Recalculate 1st-level buttons), History.
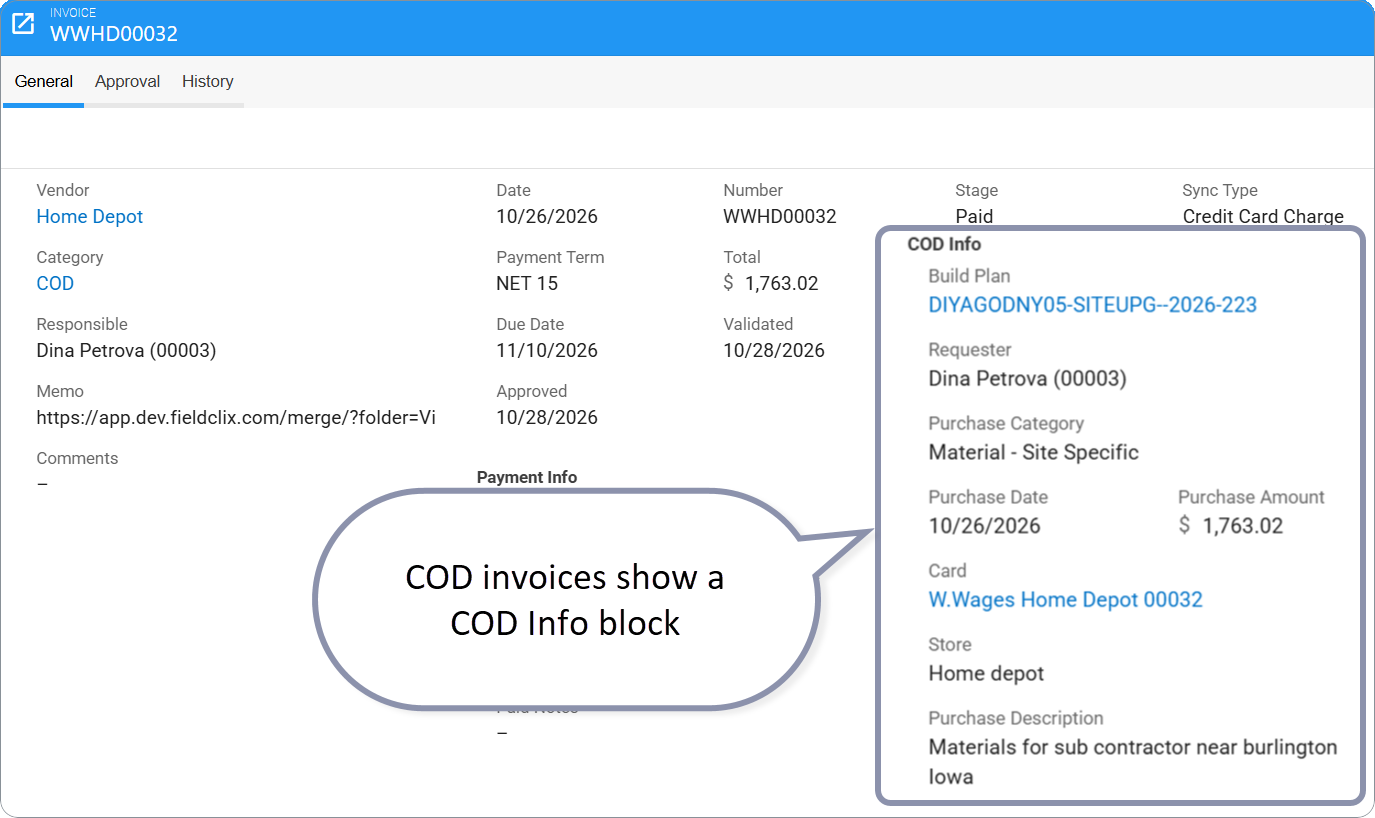
COD invoices show a COD Info block (Build Plan, Requester, Purchase Category, Purchase Date/Amount, Card, Store, Description) instead of a long capture Description.
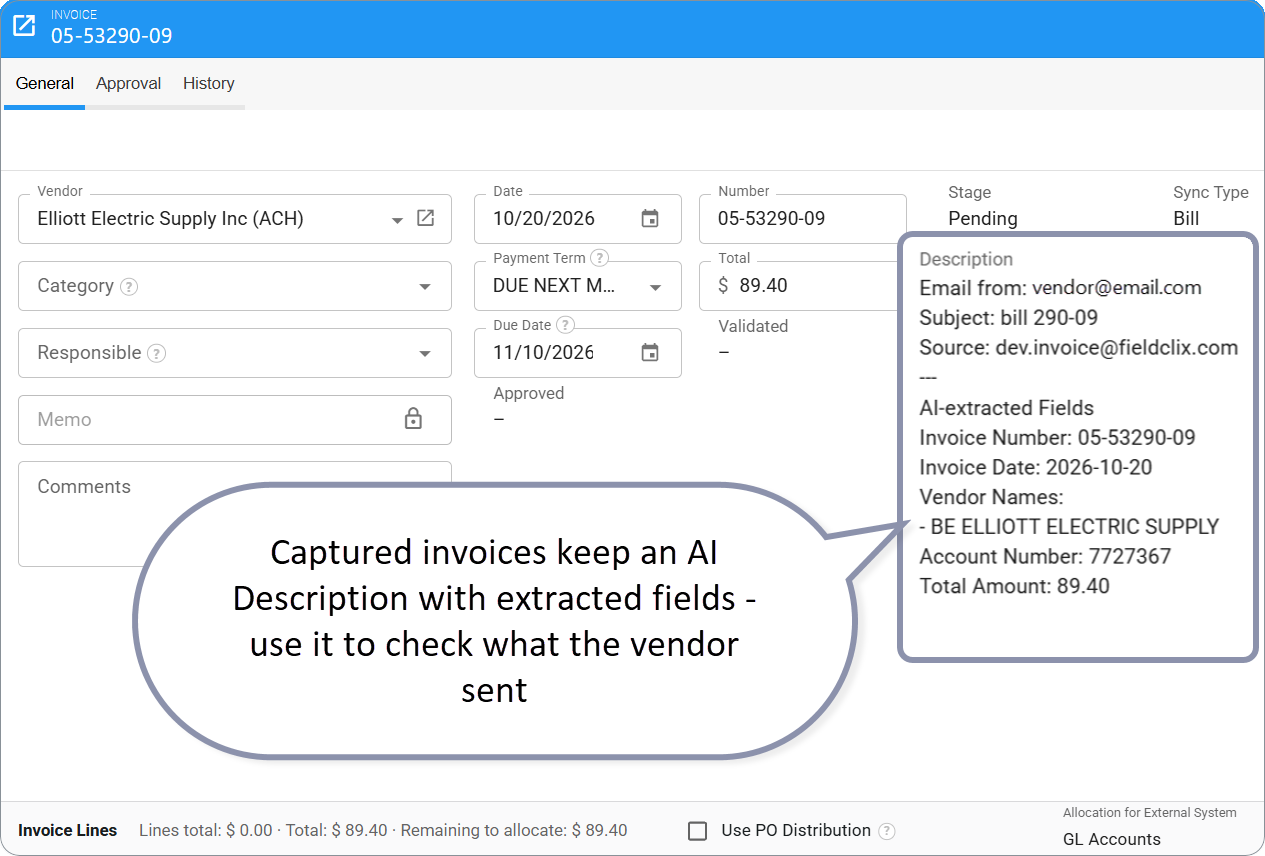
Captured invoices keep an AI Description with extracted fields — use it to check what the vendor sent.
Documents and Fill from Document
Open the invoice in Edit (Draft or Pending).
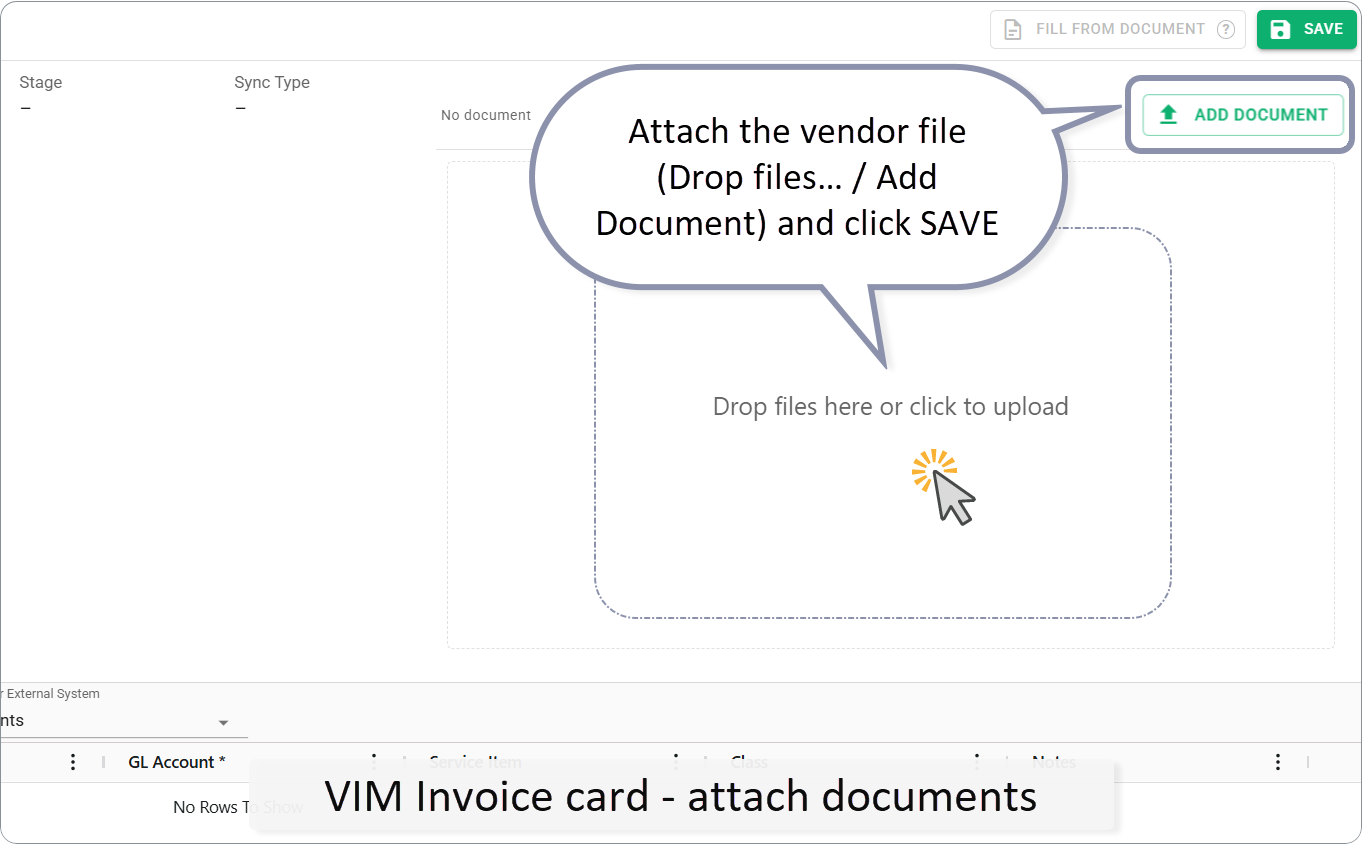
Attach the vendor file (Drop files… / Add Document) and click SAVE. Unsaved uploads are not used for AI fill.
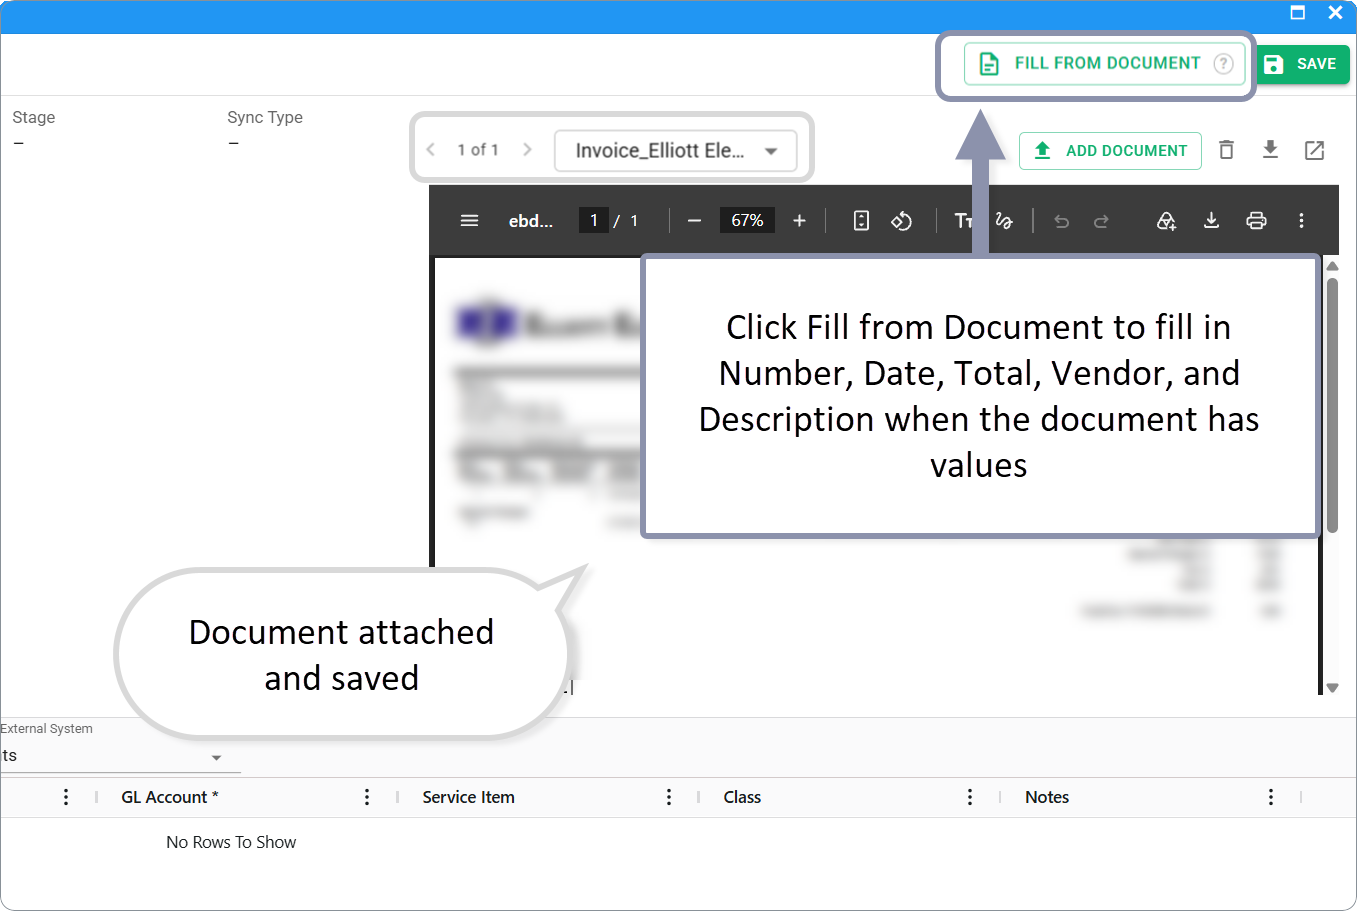
Click Fill from Document on the toolbar.
If several saved files exist, pick which one to analyze, then Select.
Fieldclix suggests Number, Date, Total, Vendor, and Description when the document has values. Empty suggestions leave your current fields as they are.
If there are warnings (for example Vendor not uniquely matched, date outside an active financial period, negative total), review the Document warnings dialog and Apply or Cancel.
When Vendor is filled, Responsible, Payment Term, and Category update as with a manual Vendor change; Due Date recalculates from Date + Payment Term.
Review allocation lines, then SAVE again before Submit / Validate.
Fill from Document does not fill Invoice Lines — only header fields. Email capture still creates bills from inbound mail; this button helps when you attach a PDF yourself.
Working with Documents
- Use the Document toolbar to delete the selected document, download and upload a new one.
- Use the drop-down menu on the left of the toolbar to switch between saved documents.
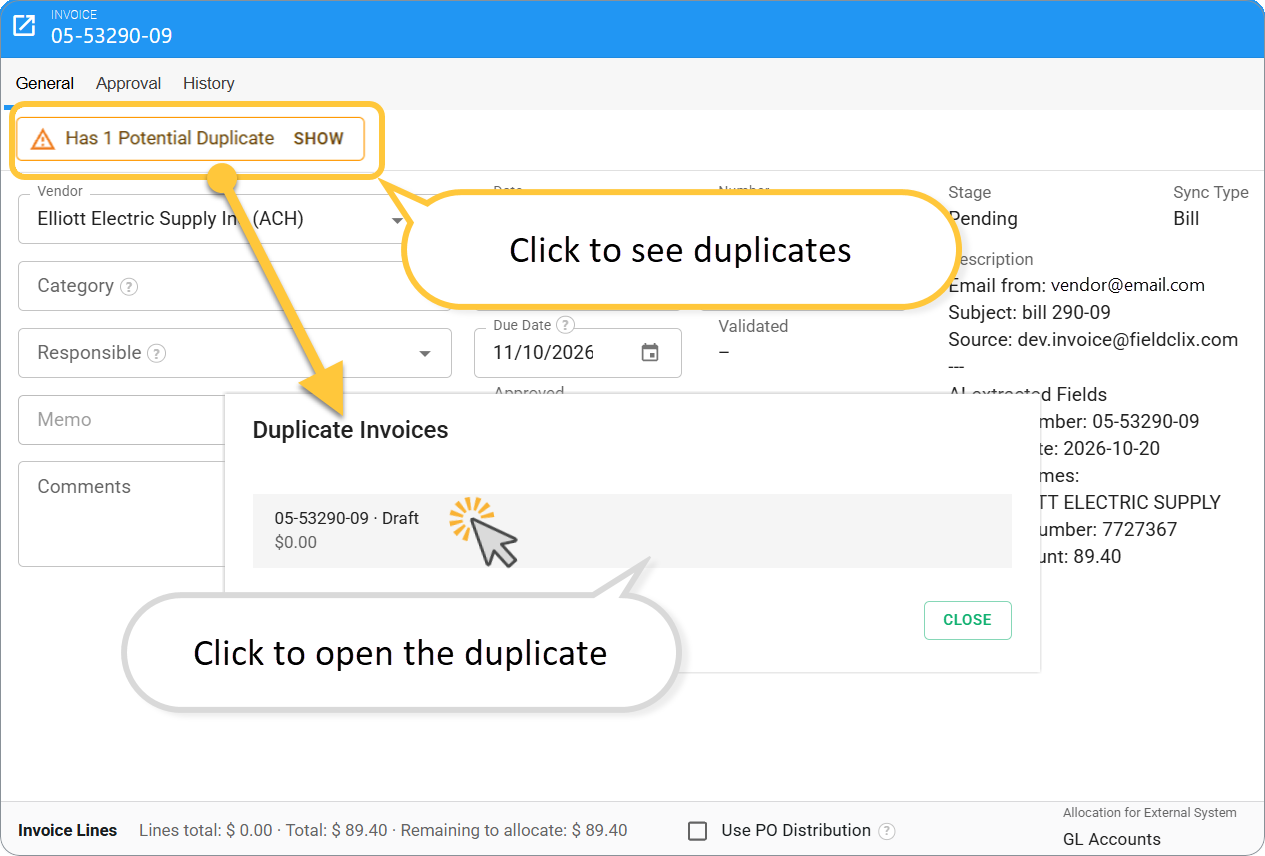
Potential duplicates
When Number and Vendor are filled and you are a VIM Validator, the toolbar can show Has N Potential Duplicate(s) with SHOW.
Opens the Duplicate Invoices dialog (number · stage · amount).
Click a row to open that invoice.
Which bills count as duplicates depends on company settings (rules can differ from client to client). Duplicates do not change stage — check them before Validate.
Tips while filling?
Fix Vendor first, then confirm Category, Responsible, and Payment Term — Vendor change overwrites them.
Check Due Date after you set Date and Payment Term.
Watch for a potential duplicates alert on the toolbar — open it before you validate.
Save with SAVE.
2. Fill allocation (Invoice Lines)
Work in Edit on the invoice card (Draft or Pending for a VIM Validator). Allocation is one Invoice Lines table on the General tab — Build Plan, Financial Account, GL / Service Item, Amount, and related fields sit on the same rows (not two separate tables).
1. Use the Invoice Lines table to
Split the invoice Total across Build Plans and accounts
Link lines to a Vendor Purchase Order when the bill uses PO distribution
Set GL Account or Service Item for external / accounting allocation
Check that the sum of line amounts matches the header Total before Validate
Validation blocks incomplete or mismatched allocation.
2. Lines may already be filled
When you create a bill, change Vendor or Category, or change COD Purchase Category, Fieldclix can rebuild default lines from category / vendor / COD defaults. Confirm if the app asks before replacing existing rows. Always review the grid after those header changes.
How columns fill when you edit a line
You change… | What else may update |
|---|---|
Financial Account | GL Account or Service Item may fill automatically (depends on Allocation for External System and company settings). |
Build Plan | OH (overhead) follows the Build Plan; Notes may become the Build Plan name; Class may fill from the BP. |
Service Item | Class may update from the service item. |
PO Line (when Use PO Distribution is on) | Amount often becomes the PO line balance; Build Plan comes from the PO and is not edited by hand. |
Which columns appear, auto-fill, or are required depends on the Invoice Category and company settings.
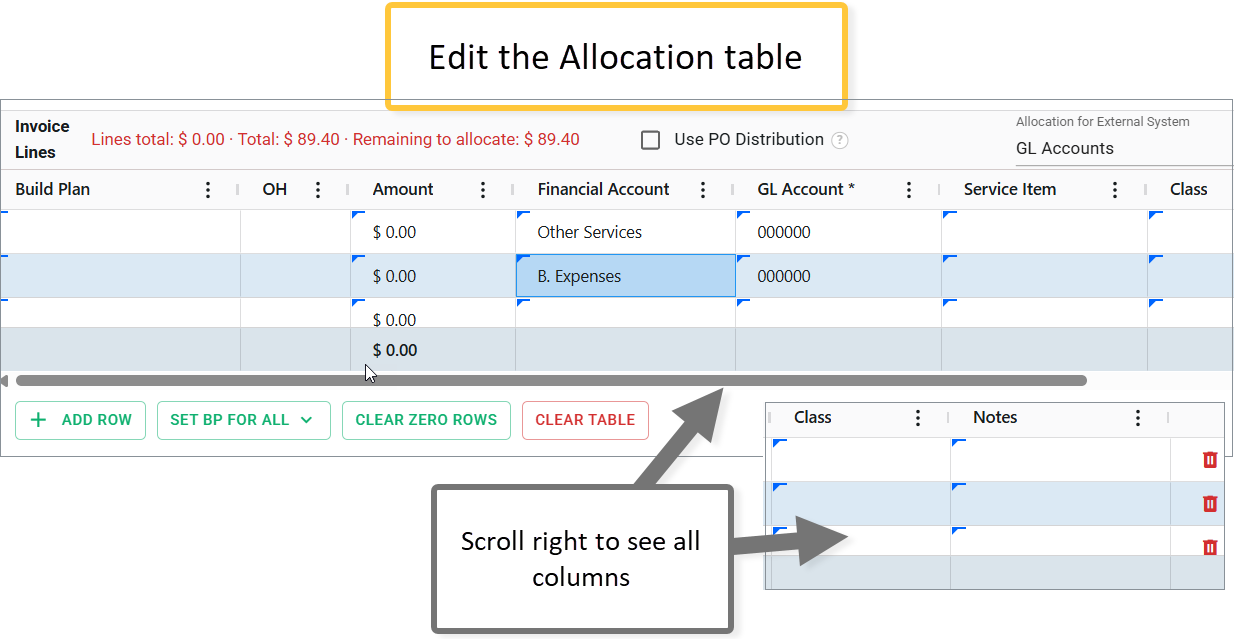
3. Add a line
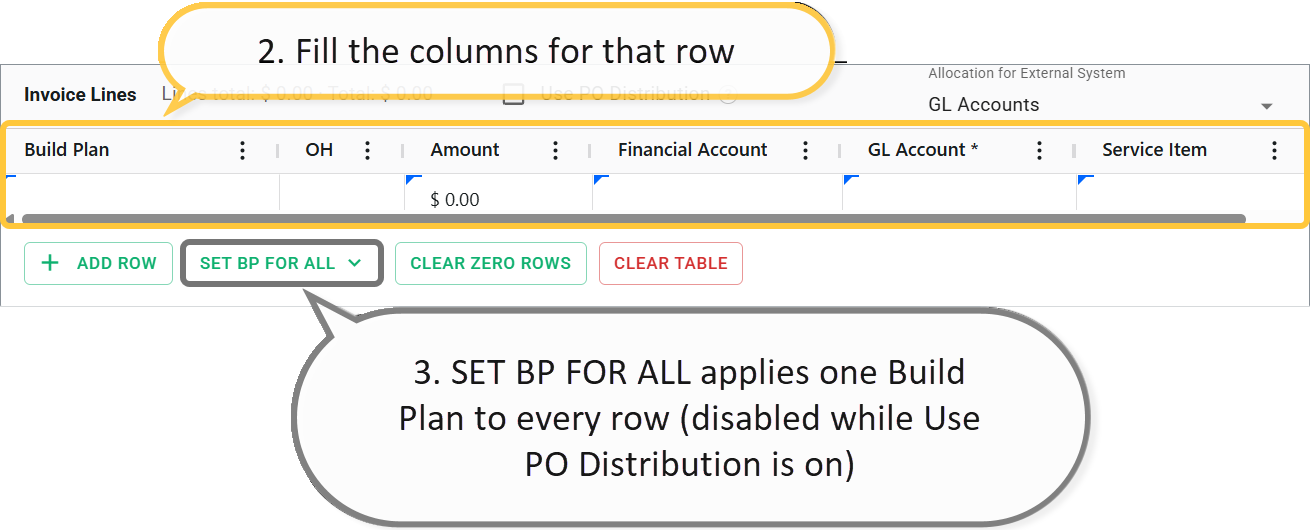
Click ADD ROW under the grid.

2. Fill the columns for that row (as shown for your category):
Build Plan — job / cost object (read-only when Use PO Distribution is on)
Amount — portion of the invoice total for this line (required; empty becomes 0)
Financial Account — when the category uses FA / PO allocation (may be hidden for external-only allocation)
GL Account or Service Item — depending on Allocation for External System above the grid
Class, Notes, OH — when your company uses them
PO Line — only when Use PO Distribution is on
3. Optional: SET BP FOR ALL applies one Build Plan to every row (disabled while Use PO Distribution is on).
4. Remove lines
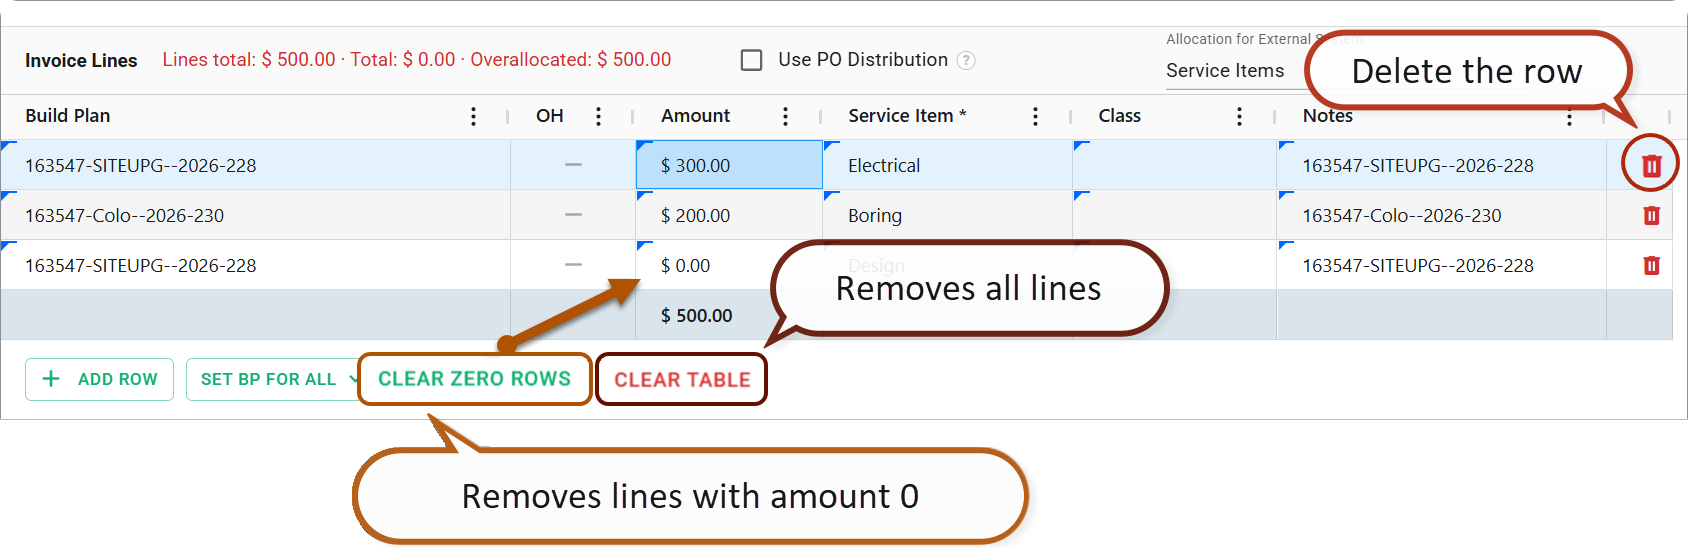
To delete one row, use the row remove control on that line in the grid.
CLEAR ZERO ROWS — removes lines with amount 0 (handy after fill-from-PO leftovers).
CLEAR TABLE — removes all lines.
5. Use the amount hint above the grid
Next to Invoice Lines, Fieldclix shows a compare line, for example:
Lines total: $ … · Total: $ … · Remaining to allocate: $ …
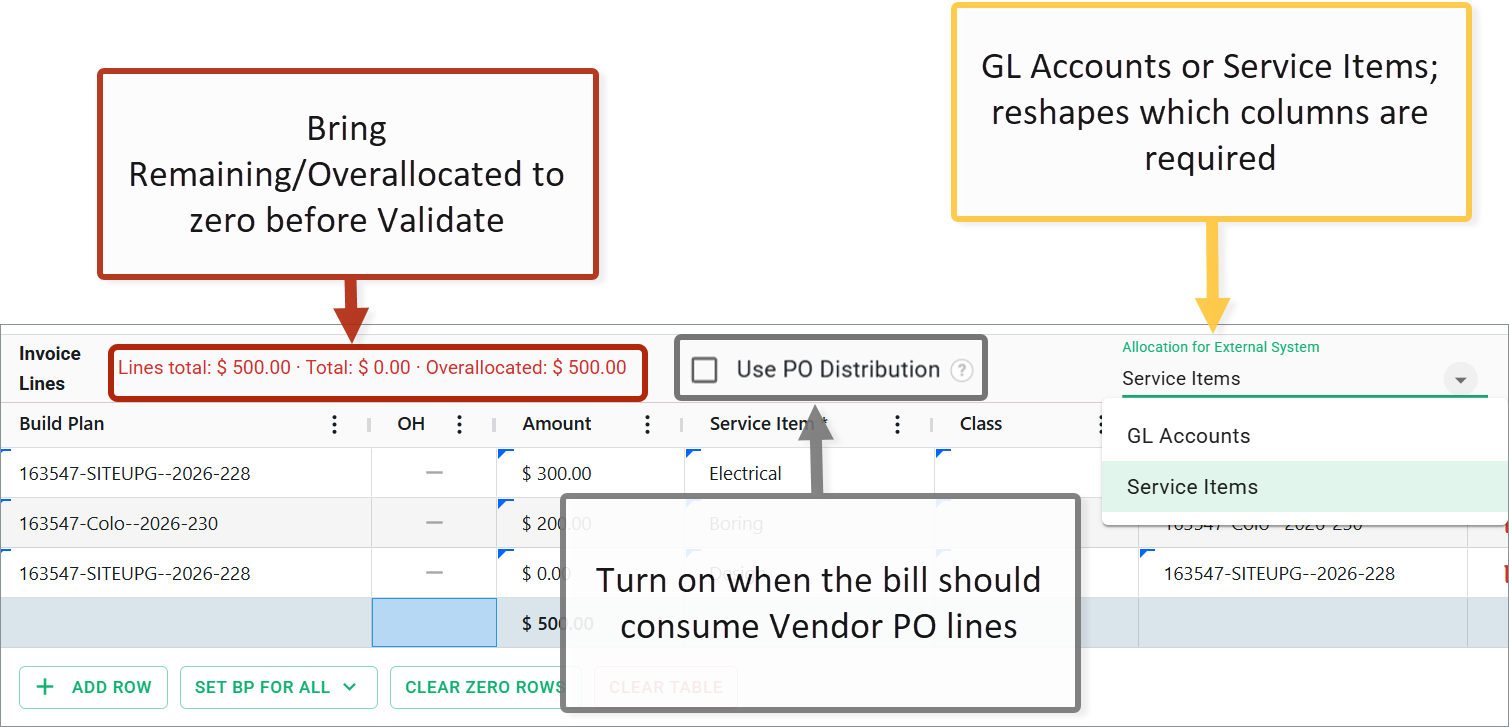
or Overallocated when lines exceed the header Total. The text turns red when lines and Total do not match. Bring Remaining to allocate to zero before Validate.
Also check:
Use PO Distribution — turn on when the bill should consume Vendor PO lines (required and locked when the Category Allocation Type is Purchase Order). Turning it off/on with existing rows may clear the table — confirm the dialog.
Allocation for External System — GL Accounts or Service Items; reshapes which columns are required.
6. If the invoice is against a Purchase Order
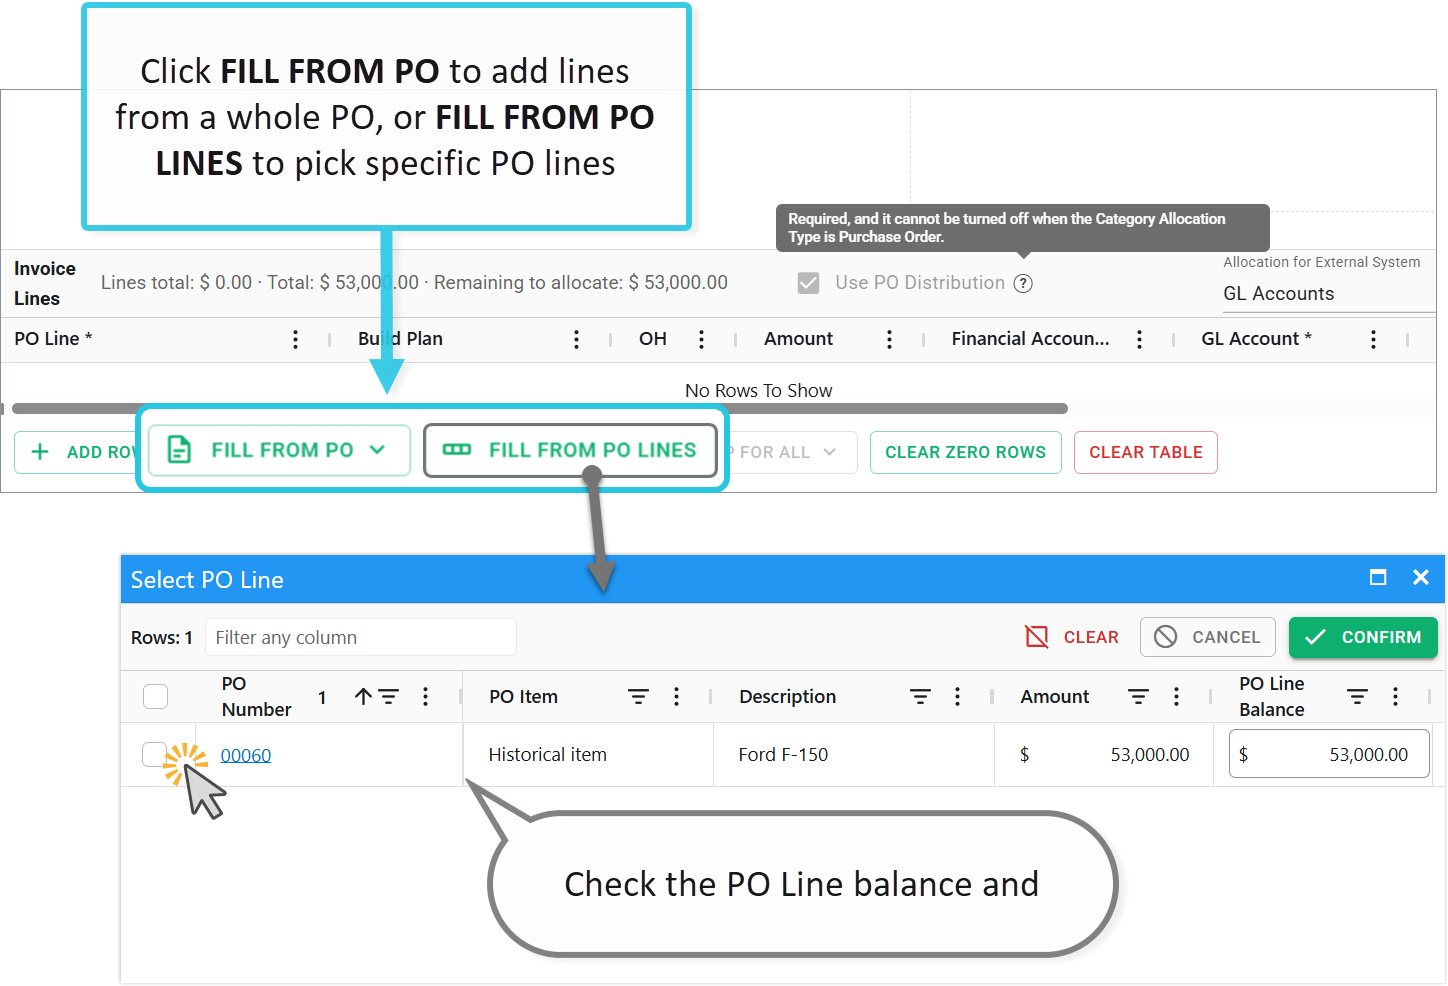
Turn on Use PO Distribution (if it is not already on).
Click FILL FROM PO to add lines from a whole PO, or FILL FROM PO LINES to pick specific PO lines.
Fieldclix adds invoice lines from the selection (amount often from the PO line balance). Adjust amounts if you are only billing part of a line.
Watch Remaining to allocate until lines cover the invoice Total.
SAVE before Submit / Validate.
To browse allocation across many bills, open VIM → Invoices → Invoice Lines (Dashboards)
3. Validate and send for approval
Submit (Draft only)

If you created the invoice with NEW INVOICE or NEW COD, click Submit when the Draft is ready. Stage becomes Pending.
Creator or VIM Validator can Submit.
Validate (Pending)
 VIM Validator checks vendor, amounts, documents, and lines, then clicks Validate.
Fieldclix blocks Validate when, for example:
Required header fields are empty (Vendor, Number, Category, Date, Payment Term, and Responsible when your rules require it)
Allocation lines do not meet the Invoice Category / company rules (Build Plan, FA, GL or Service Item, Class when mandatory, PO lines when using PO distribution)
Line amounts do not cover the invoice Total
The Vendor is suspended
(Same suspended-vendor check also blocks Send for Approval, Approve, and Force Approve.)
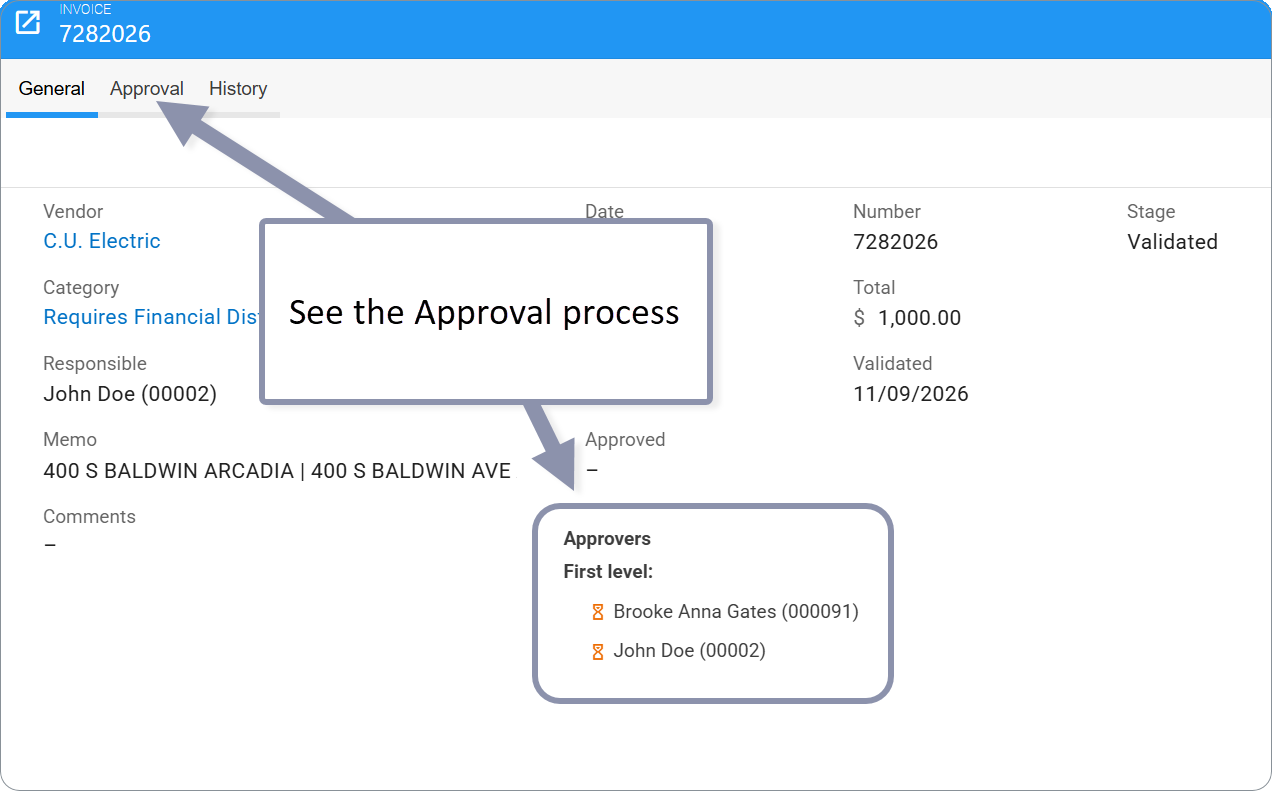
Stage becomes Validated. Fieldclix calculates default Approvers from the Invoice Category (shown on the Approvals area and Approval tab).

If approval is not required for this amount/category, you may see Validate and Approve — that validates and moves straight toward Approved in one step.
Send for Approval (Validated)

When approval is required, the validator clicks Send for Approval. Stage becomes Under Approval.
Optional tools are available on the Approval tab while Validated:
Change 1st level Approvers — set first-level people manually
Recalculate Approvers — restore category-based defaults
Return to Pending

From Validated or Rejected, a VIM Validator can Return to Pending to fix the bill and validate again.
That reopens header/lines for the validator.
4. Reject
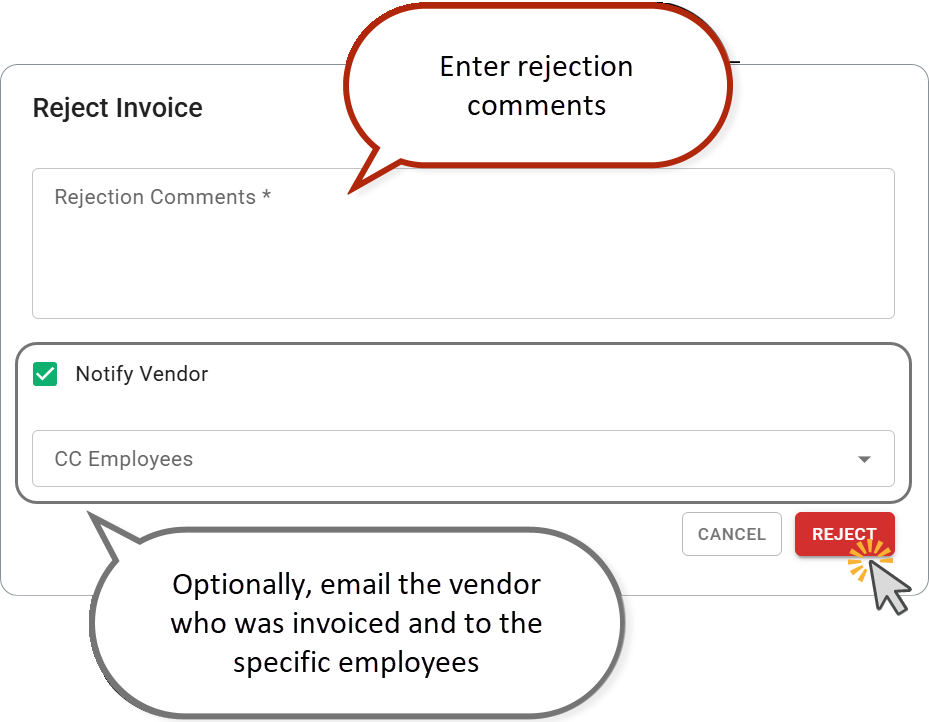
From Pending, a VIM Validator clicks Reject. In the dialog:
Rejection Comments — required
Notify Vendor — optional (often on by default)
CC Employees — optional
Stage becomes Rejected — closed for editing. Use Return to Pending to fix and try again, or DELETE (below).
5. Delete
On the invoice card, DELETE removes the Vendor Invoice from Fieldclix (confirm in the dialog).
Who | When they can delete |
|---|---|
VIM Validator | Stage is Draft, Pending, Rejected, or Cancelled |
COD requester (own COD) | Stage is Draft only |
You cannot delete invoices in Validated, Under Approval, Approved, Partially Paid, or Paid. Use Void (→ Cancelled) for approved/paid bills when you need to cancel them; a validator can then delete a Cancelled invoice if your process requires removing it.
Deleting a bill only in QuickBooks does not delete it in Fieldclix.
6. Approve
Approve (Under Approval)

Assigned Approvers open the invoice (often from Review → By Assignee) and click Approve. Add comments when prompted. Advanced VIM Approver may edit allocation lines in this stage; other fields stay locked for general edit.
If there are two levels, each level must approve in order.
For Revision (Under Approval)

An approver who needs changes uses For Revision. The invoice goes back so AP can correct it (toward Pending for another pass). Check History on the invoice for the approver’s comments and why it was returned.
Force Approve (Under Approval)

Employees with VIM Approval Override can Force Approve while the invoice is Under Approval, skipping remaining approvers. Use only when your company policy allows it.
Force Approve is not available from Validated alone — send for approval first, or use Validate and Approve when approval is not required.
After Approved
Stage Approved. Sync may start if the category has Sync to External System. From here, header/lines edits are for Accountant and Bookkeeper (also in Partially Paid / Paid). Accountants handle Pay / Void next.
6. Void (Cancelled)
Accountant and Bookkeeper can Void an invoice that is Approved, Partially Paid, or Paid.
Confirm the Void dialog. Stage becomes Cancelled.
You can also cancel from accounting when reverse sync is on. How you void the bill there differs by product:
- QuickBooks Desktop → Use the Void action on the bill → Cancelled in Fieldclix
- QuickBooks Online → Set all line amounts to zero on the bill (QBO has no separate Void for bills) → Cancelled in Fieldclix
Deleting a bill only in QuickBooks does not remove it from Fieldclix — contact Support if you need a hard delete.
7. Sync to accounting
Sync is controlled mainly by:
Invoice Category Sync to External System
Invoice Sync Type (Bill, Credit Card Charge, or Check — often from COD Card and Account Type)
Approved invoices that should sync are picked up by your accounting integration. Credit Card Charge style COD bills may show as paid after a successful charge sync.
Field mapping and edge cases: Field Mapping QuickBooks (or your company’s accounting guide).
Validators do not “click Sync” on the card — they Approve; integration does the rest.
8. Pay / Partially Paid / Paid

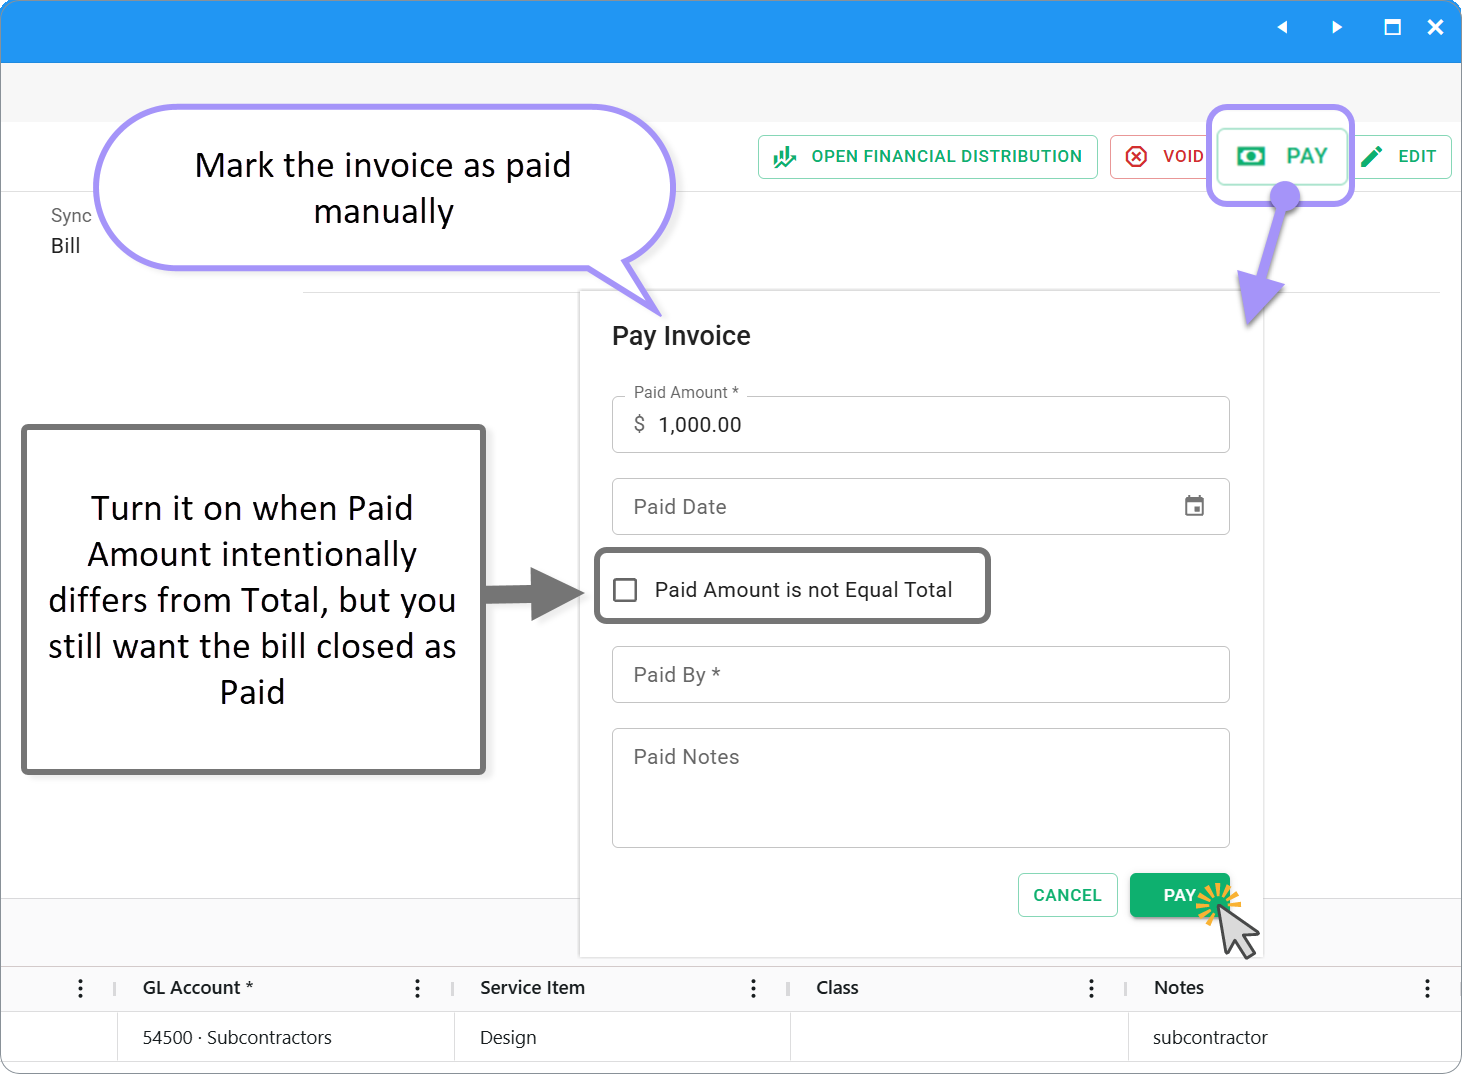
Accountant and Bookkeeper use Pay on Approved (or related) invoices when recording payment in Fieldclix:
Paid Amount, Paid Date, Paid By, Paid Notes
Option when paid amount is not equal to total → can lead to Partially Paid
Stages:
Stage | Meaning |
|---|---|
Partially Paid | Payment recorded but less than full total |
Paid | Fully paid |
Cancelled | Voided |
Payment stages can also arrive from accounting reverse sync, depending on your integration.
Checkbox Paid Amount is not Equal Total
Turn it on when Paid Amount intentionally differs from Total, but you still want the bill closed as Paid — for example a write-off, rounding difference, or an agreed under/over payment.
Example: Total is $1,000, vendor settles for $980. Enter 980, check Paid Amount is not Equal Total, fill Paid By → stage becomes Paid. Without the checkbox, $980 from Approved would become Partially Paid.
FAQ
Q: Why don’t I see Validate?
A: The invoice is not Pending, or you are not a VIM Validator. Open from Review after Submit or after email capture.
Q: Why can’t I delete this invoice?
A: Delete is only for Draft, Pending, Rejected, or Cancelled (VIM Validator), or your own COD in Draft. For Approved / Paid bills use Void first.
Q: Why can’t I Force Approve from Validated?
A: Force Approve works in Under Approval. Use Send for Approval first, or Validate and Approve when the category does not require approvers.
Q: I changed Vendor and lost my Category.
A: Expected — Vendor defaults overwrite Category, Responsible, and Payment Term. Set them again if needed and re-check lines.
Q: Can validators still edit totals after Approved?
A: No. After Approved (and Partially Paid / Paid), edits are for Accountant and Bookkeeper. Fix issues before Approve when you can.
Q: Why can’t I validate — “Vendor is suspended”?
A: The vendor is suspended in Fieldclix. Clear the suspend (or pick another Vendor) before Validate / Send for Approval / Approve.
Next in the set
→ Where to work: VIM Invoices and Review Dashboards
← Before this: Create Vendor Invoices
Was this article helpful?
That’s Great!
Thank you for your feedback
Sorry! We couldn't be helpful
Thank you for your feedback
Feedback sent
We appreciate your effort and will try to fix the article