TABLE OF CONTENTS
- Client Purchase Orders in the FCX General AR Process
- Who can create Client Purchase Orders
- Add Client Purchase Order to FCX
- Open BP's CIM tab via Build Plans Dashboard and create CPO
- Enter PO Number & Received Date
- Enter PO Line Items
- Attach CPO Document to CPO if applicable
- Client Purchase Order Card
Client/Customer Purchase Orders in the FCX General AR Process

Who can create Client Purchase Orders
Access to the CIM Purchase Orders reference: Financial employee role — full access.
Add Client Purchase Order to FCX
The Purchase Card looks different depending on your company settings.
- QTY and Unit Costs: Shows quantity and unit price.
- Totals only: Shows total amount per line.
This is controlled by a system setting. Below are the instructions for CPO including Total only.
Process Steps Overall
- Receive Client Purchase Order CPO (email body, document, external system, etc.)
- Open BP's CIM tab via Build Plans Dashboard or BP card.
- Create a CPO
- Click on New Purchase Order on CIM tab of BP card
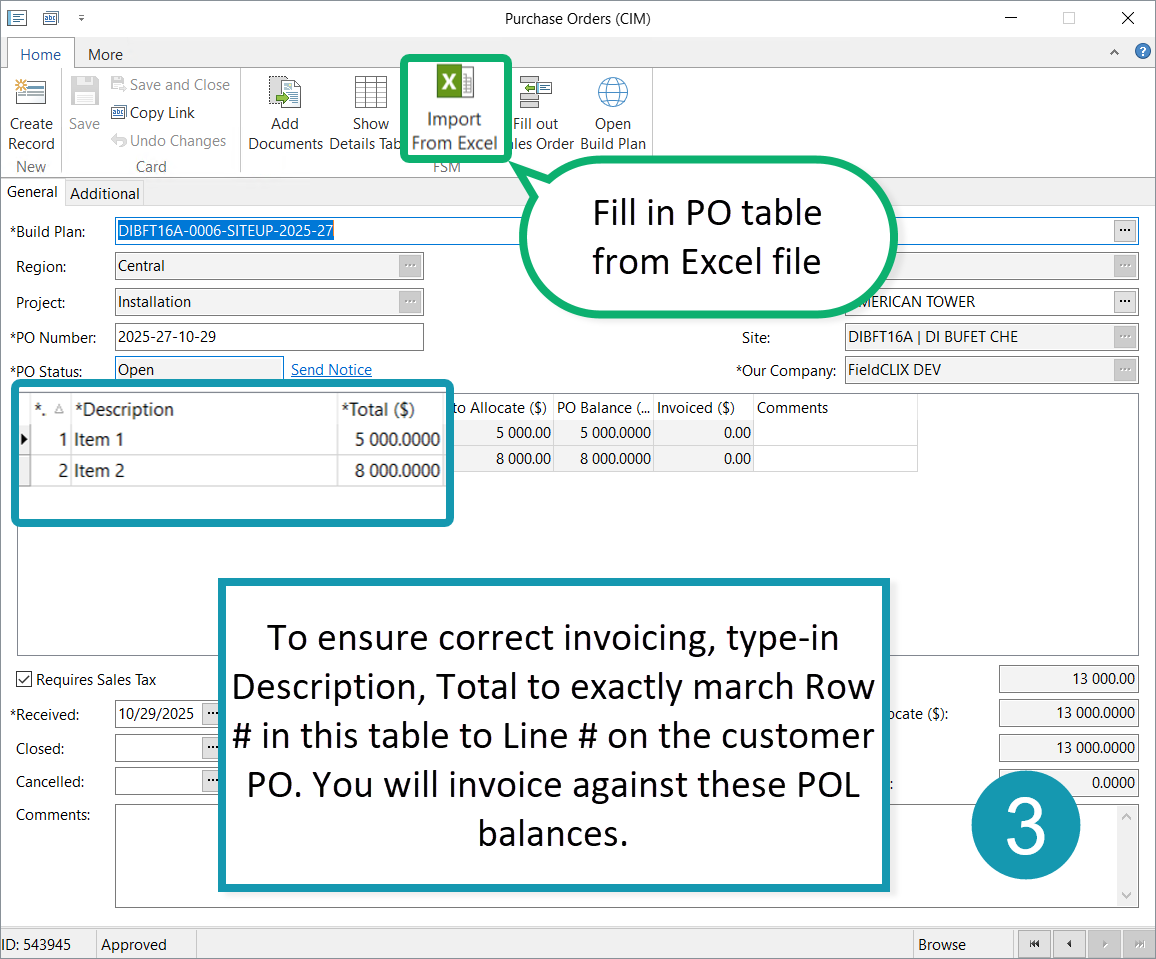
- Enter PO Number & Received Date.
- Enter PO Line Items with verbatim #, description and total. There are 2 ways to do this:
- Manually enter the lines into the PO's table
- Import from Excel
- Attach CPO Document to CPO if applicable.
Open BP's CIM tab via Build Plans Dashboard and create CPO

Enter PO Number & Received Date
NOTE: The PO Number MUST be unique! This is true even if a prior PO with the same PO# was Cancelled. To reuse the PO#, you need to delete the other PO or change its PO#. If you have difficulty deleting a PO, contact FCX Support.
The row number will be filled in as you enter data: either the description or the total amount.

Enter PO Line Items
Enter PO Lines Manually
- Add PO Description and Total.
- To ensure correct invoicing, match each row in the table exactly to the line number on the customer PO. You will invoice against these PO line (POL) balances.
Import PO Lines From Excel
To import PO details correctly, edit the file in the required format.
- Place all data on the 1st sheet.
- Enter column names in the first row.
- Enter PO Line details starting from the second row.
| Column 1 | Column 2 | Column 3 |
|---|---|---|
| Description | Total | Comments |
Attach CPO Document to CPO if applicable

Client Purchase Order Card
PO Balances
- Total ($) = Full value of the PO line.
- Remaining to Allocate ($) — Amount not yet linked to any Sales Order.
- PO Balance ($) = Total $ - Invoiced $. Money still available to invoice.
- Invoiced ($) = Amount allocated to Sales Orders and invoiced.

Mark the PO as "Requires Sales Tax"
- Open the PO Card.
- Tick the box Requires Sales Tax.
- A Sales Tax Item must be filled in the CIM Invoice.

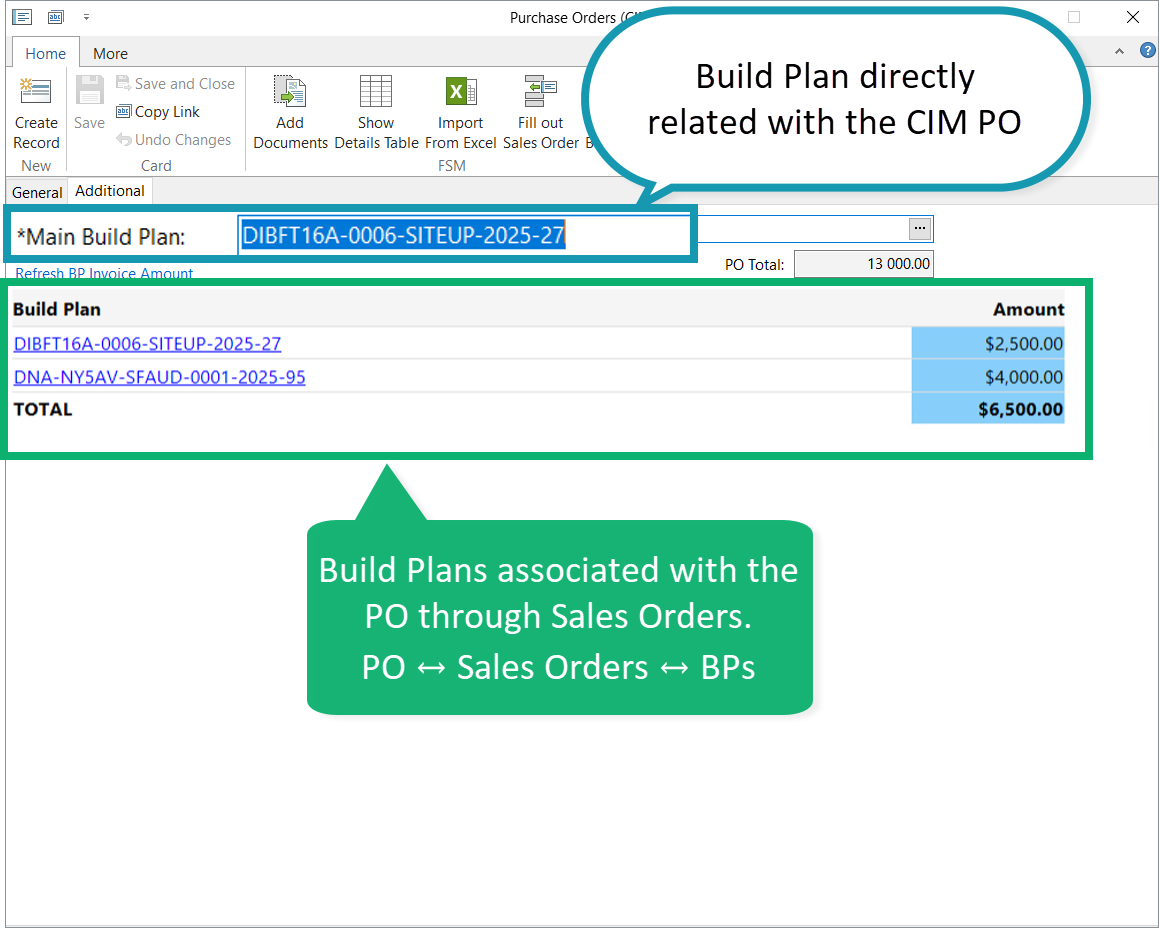
View Build Plans Linked to the PO
Go to the Additional tab in the PO Card.
You will see two types of links:
- Direct Link — The main Build Plan entered in the Build Plan field of the PO.
- Via Sales Orders — Build Plans connected through Sales Orders: PO ↔ Sales Order ↔ Build Plan
Extra Actions in the PO Card
- Show Details Table: Displays the PO details table as a list for quick review of all lines.
- Fill out Sales Order: Creates a new Sales Order and copies all PO details (description, totals, etc.).
- Send Notice: Creates a task with the PO record attached (e.g., to remind a supplier).
- Related Documents: Opens all files linked to the PO (PDFs, quotes, emails, etc.).

Read next: CPO: Close, Cancel, Change, Delete
Was this article helpful?
That’s Great!
Thank you for your feedback
Sorry! We couldn't be helpful
Thank you for your feedback
Feedback sent
We appreciate your effort and will try to fix the article