TABLE OF CONTENTS
- VIM Invoice Capture with AI
- Recurring Bill
- COD Purchase
- Manually
VIM Invoice Capture with AI
Overview
When a vendor sends an invoice to your configured capture email address for example invoice.[yourcompany]@fieldclix.com.) the VIM Invoice Capture Service processes each supported attachment and creates a VIM Invoice in Pending stage.
The email address for the capture service can be configured for a specific Class to segregate Vendor invoices.

The capture service identifies the class from the email address to which an invoice is sent, and fills in that Class in the corresponding field in the VIM Invoice card.

This can be useful when you want to allow a VIM Validator to review only a certain class of invoices. VIM Validator Employee Role supports the filter by Class.

Request FCX Support to use specific rooting of the capture service.
The service always uses AI to analyze the document:
- Text is extracted from the attachment (OCR on the first page plus full-document parsing).
- AI reads the invoice layout, email subject, and body text.
- Structured invoice data is written to the VIM Invoice card and to the Description field.
- The system attempts to match a Vendor from your vendor master data.
- The original attachment is uploaded and linked to the invoice.
One supported attachment = one VIM Invoice. Supported formats: PDF, DOC, DOCX, XLS, XLSX.
Attachment limits
| Rule | Detail |
|---|---|
| Supported formats | PDF, DOC, DOCX, XLS, XLSX |
| One attachment = one invoice | Each supported file in the email creates a separate VIM Invoice |
| Recommended file size | Keep attachments under 20 MB (total per email) to avoid capture errors |
| Empty attachments | Files with 0 bytes are rejected |
| No attachments | Emails without supported attachments are not captured |
| Unsupported formats | PNG, JPEG, and other non-invoice formats are ignored (not converted) |
Notes:
- If an email contains both a PDF invoice and a PNG logo, only the PDF is processed.
- If several supported files are attached (for example, two PDFs), the service creates one VIM Invoice per file.
- The 20 MB limit is an operational guideline from the capture workflow (email ingestion and document upload). Very large files may fail even when the format is supported — split oversized documents or ask the vendor to send a smaller PDF.
Document analysis — what AI reads
- AI extracts text from the invoice (header fields, labels, amounts).
- Vendor Name comes from the issuer/seller block in the invoice header — not from Bill To or Ship To.
- Account Number is the customer/account ID shown on the invoice (often labeled Customer ID, Acct No., or similar). It may also appear in the email subject line.
- For vendors with distinctive layouts, the service may apply a vendor-specific extraction profile (for example GME Supply, StratusComm, CLC Lodging) to read fields correctly.
Fields extracted by AI
| Field | VIM Invoice field | Notes |
|---|---|---|
| Invoice Number | Invoice # | |
| Invoice Date | Invoice Date | Applied only if the date falls in an active financial period; otherwise left empty |
| Vendor Name | Used for vendor matching | Not stored as a separate requisite; always copied to Description |
| Account Number | Used for vendor matching | Customer/account ID from the invoice header or email subject; not stored as a separate requisite |
| Total Amount | Total Invoice | Amount owed on the invoice. Prefer Amount Due / Balance Due / Invoice total. Not a Cash Discount, early-payment / prompt-pay / terms discount. Also excludes credit-card and convenience-fee totals. |
When a Vendor is matched, the invoice card also inherits defaults from the vendor record: Payment Term, Invoice Category, Responsible Employee, and default Expense allocation rows.
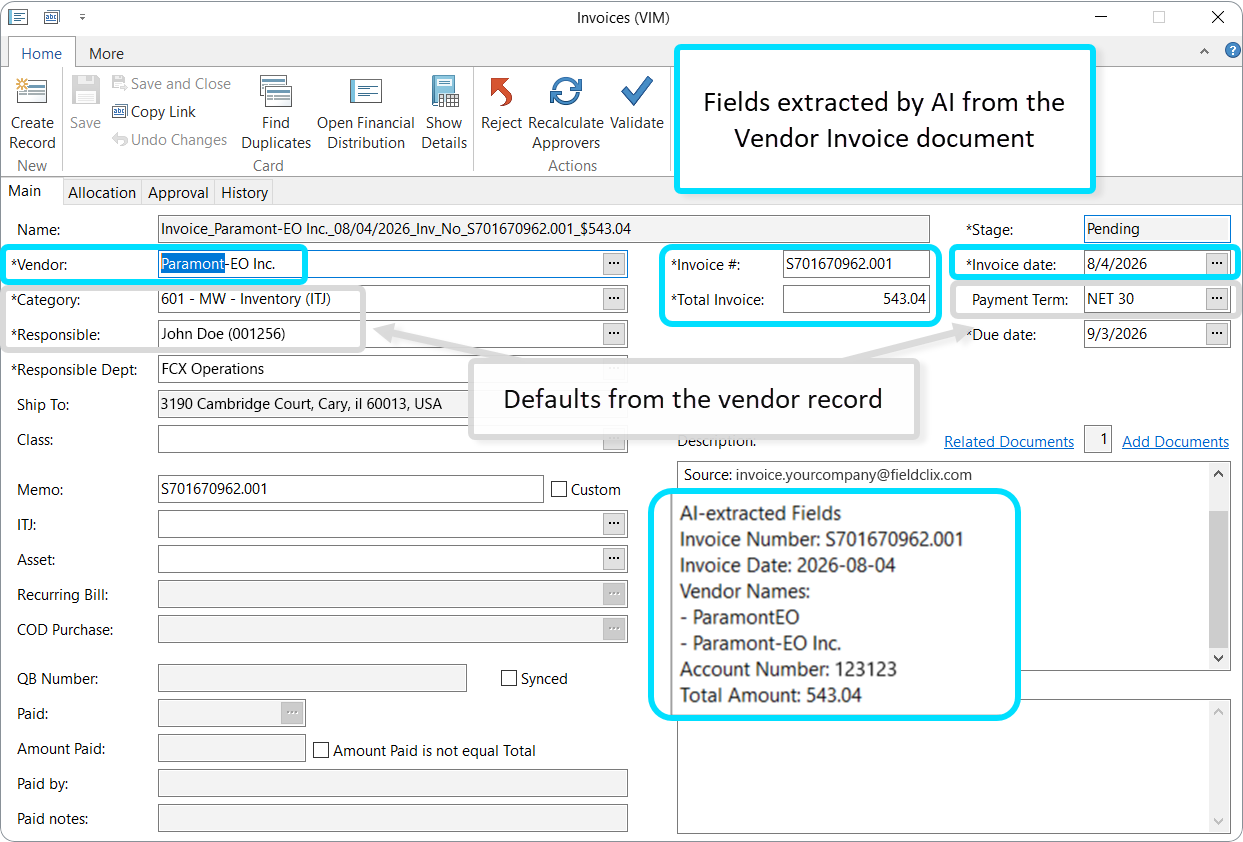
Description block (AI-extracted Fields)
Every captured invoice includes a Description with email metadata and an AI-extracted Fields section. This block is always written — even when the Vendor field is filled automatically.
Example:
Email from: vendor@example.comSubject: Your Invoice is AttachedSource: invoice.[yourcompany]@fieldclix.com---AI-extracted FieldsInvoice Number: S701670962.001Invoice Date: 2026-08-04Vendor Name: Paramont-EO Inc.Account Number: 123123Total Amount: 543.04
If vendor matching fails, validators use this block to select the correct vendor and to update vendor master data for future captures.
How the system selects a Vendor
The service loads active vendors from Fieldclix (Name, Print Name, Account Number, Email Domain) and applies three matching steps in order. At each step, a vendor is set only when exactly one record matches. AI may return one or two vendor-name variants from the same invoice (brand name and full legal name). Matching still uses the three steps below; if more than one vendor in Fieldclix fits, Vendor stays empty for manual review.
Step 1 — Account Number + vendor name (most precise)
Requires both values from AI extraction:
- Account Number on the vendor card (synced from QuickBooks Acct No.) equals the AI-extracted account number.
- At least one word from the AI Vendor Name appears in the vendor Name or Print Name.
Use this step to distinguish divisions of the same company.
Example — same Print Name, different divisions:
| Print Name | Name | Account Number |
|---|---|---|
| Graybar Electric Co. | Graybar Electric | 123456 |
| Graybar Electric Co. | Graybar Electric - Verizon MMDD | 622270 |
Email subject: Acct No. 124271: Your Invoice From Graybar Electric is Attached
AI extracts Account Number 123456 and vendor name Graybar Electric Company, Inc. → matches Graybar Electric (account 123456), not the Verizon division.
Step 2 — Exact vendor name
AI Vendor Name is compared to vendor Name or Print Name (exact match after normalizing punctuation and spacing).
Example — different spellings on the invoice:
AI may read the issuer as ParamontEO in one place and Paramont-EO Inc. in another. If Paramont-EO Inc. is the vendor Name or Print Name in Fieldclix, Step 2 can match even when the invoice uses inconsistent formatting.
Combined with Account Number 123123 on the vendor card, Step 1 provides the most reliable match when multiple name variants appear in the document.
Step 3 — Sender email domain
The domain of the sender address (part after @) is matched to Email Domain on the vendor card. Works only when exactly one active vendor has that domain.
Limitation: Forwarded emails may use the wrong sender domain. In that case, rely on AI Vendor Name and Account Number in Description, or update vendor master data.
When Vendor is not filled automatically
The invoice is still created in Pending stage with the attachment linked and AI-extracted values in Description.
You cannot move the invoice to Validated, Under Approval, or Approved without selecting a Vendor — the system shows Vendor is not specified.
Validator actions
- Open the invoice and review Description → AI-extracted Fields.
- Select the correct Vendor on the invoice card.
- Verify Invoice #, Invoice Date, and Total Invoice against the attached PDF.
- Continue validation as usual.
Prevent repeat mismatches
Update the vendor record in QuickBooks / Fieldclix:
| Field in Fieldclix | QuickBooks / setup | Purpose |
|---|---|---|
| Account Number | Acct No. | Primary tiebreaker for divisions with the same company name |
| Print Name | Print Name | Match when invoice vendor name differs from internal Name |
| Email Domain | Email Domain (domain only, no @) | Fallback when invoices always come from the same sender |
Ensure the vendor is Active. Inactive vendors are excluded from automatic matching.
Send notifications to VIM Validators and Vendor
We can notify the Vendor of each change in the invoice stage. For instance, when an invoice moves to the pending stage, we will notify the Vendor about successful invoice capture. This part is configurable. You can choose invoice stages – when you want to notify the Vendor.
You should activate the checkbox 'send email notifications' in Vendor Card to notify Vendor.Notifications for VIM Validator depend on the settings in the Notifications Events. Typically the FCX System has an invoice stage change notification. Read more about FCX notifications here.
Recurring Bill
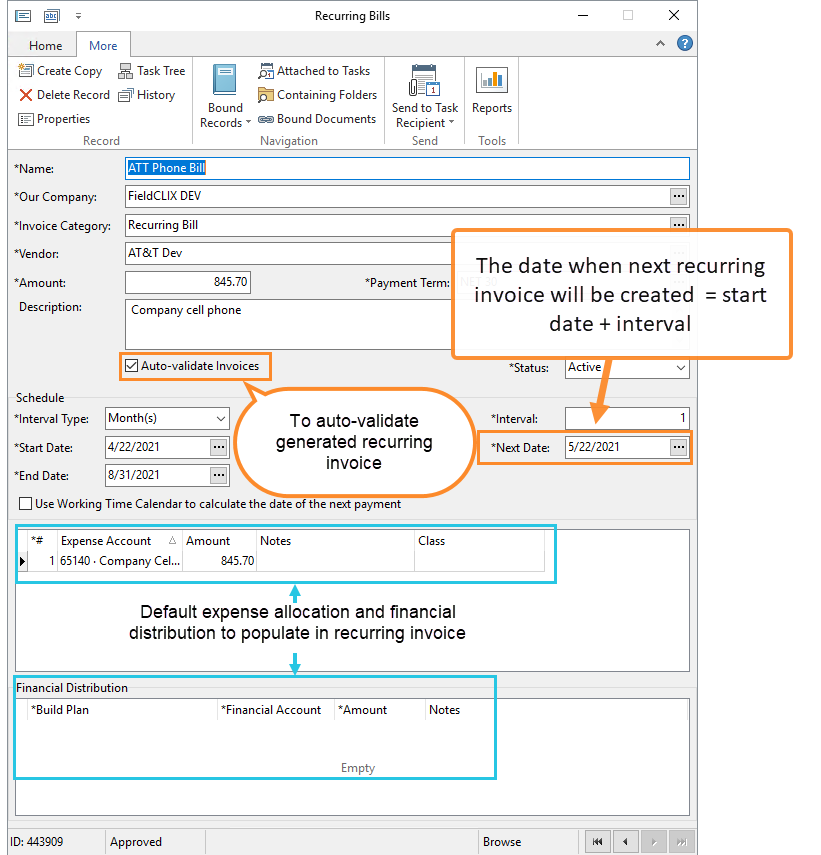
Recurring Bills let you automate the process of creating recurring invoices. In the recurring bill, you can assign default expenses and set required financial distribution.
The FCX System will generate recurring invoices at predetermined intervals.
COD Purchase
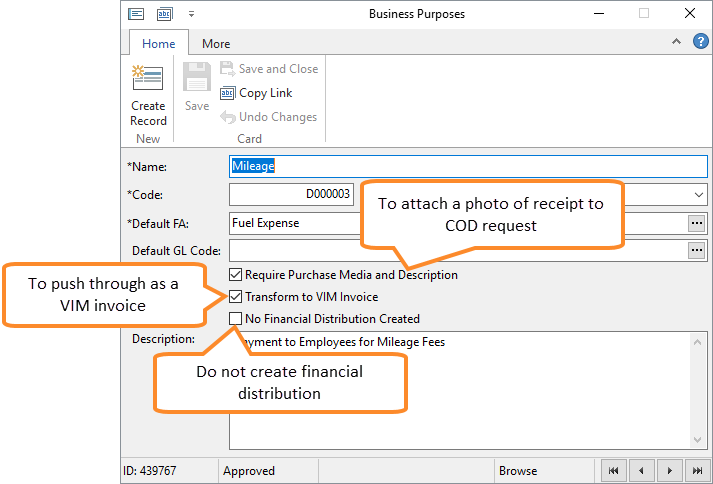
We use the Business Purposes (Purchase Category) reference to manage COD Purchases invoicing. In this reference, we describe:
- how to process COD requests from Employees
- do we need to transform the request to a VIM invoice
- do we need to create financial distribution to Employee's expense reimbursement
- what financial account use for allocation
- what GL Code is used to assign a financial entry in the organization's ledger
Commonly we work with COD Purchases that do not require financial distribution in QuickBooks and use them only for managerial accounting in FCX.We should mark the checkbox 'Transform to VIM Invoice' to create a VIM invoice. Drawing on this setting, the system generates the invoice when submitting a request to the COD of the corresponding purchase category, to be exact, moving from the draft to the pending stage.
Manually
You can create VIM Invoices manually in two ways:
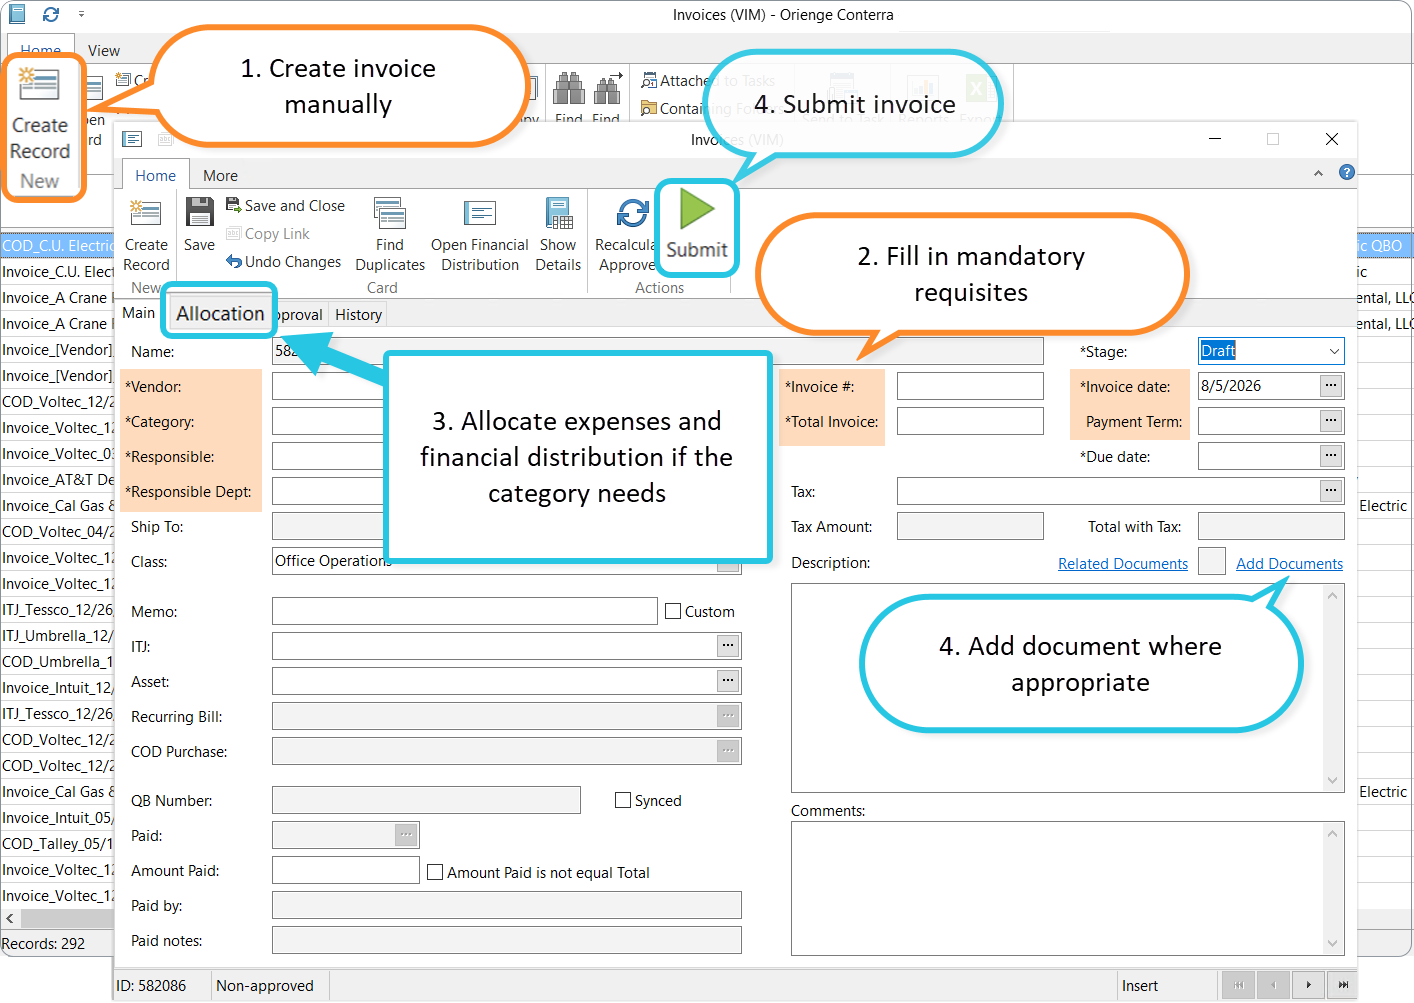
1. Through VIM Invoices reference
- Open the VIM Invoices reference in whichever way is most convenient for you: via Quick Launch -> VIM Invoices or the VIM Invoices dashboard -> Open Invoices button.
- Fill in the mandatory fields. Read more about each field and the allocation tables in the separate article: VIM Invoice.
- Allocate expenses by GL Codes/Service Items and Financial Accounts, if the invoice category requires it.
- Add a document where appropriate.
- Then submit the invoice for validation.
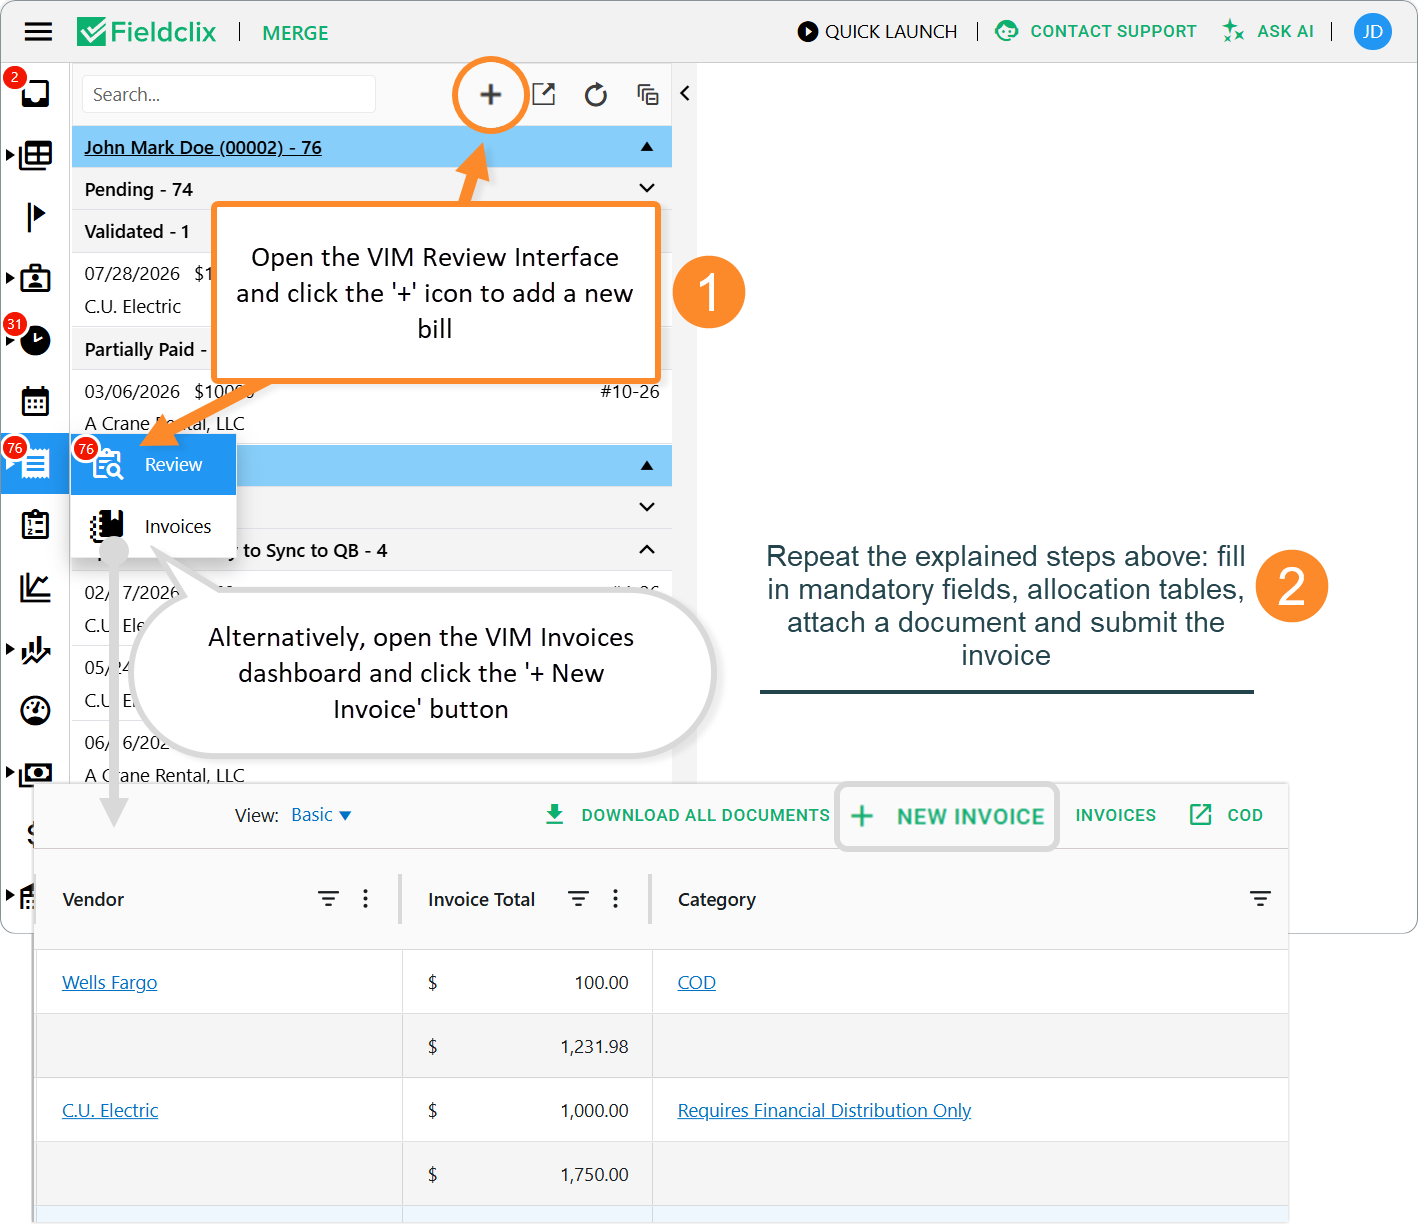
2. Through VIM Interface or VIM Invoices dashboard
- Open the VIM Review Interface and click the '+' icon to add a new bill.
- Alternatively, open the VIM Invoices dashboard and click the '+ New Invoice' button.
- Repeat the explained steps below: fill in mandatory fields, allocation tables, attach a document and submit the invoice.
Was this article helpful?
That’s Great!
Thank you for your feedback
Sorry! We couldn't be helpful
Thank you for your feedback
Feedback sent
We appreciate your effort and will try to fix the article